<?xml version="1.0" encoding="utf-8"?><feed xmlns="http://www.w3.org/2005/Atom" ><generator uri="https://jekyllrb.com/" version="4.4.1">Jekyll</generator><link href="https://eduardovra.github.io/feed.xml" rel="self" type="application/atom+xml" /><link href="https://eduardovra.github.io/" rel="alternate" type="text/html" /><updated>2026-08-19T22:16:34+00:00</updated><id>https://eduardovra.github.io/feed.xml</id><title type="html">Eduardo Vieira</title><subtitle>Eduardo Vieira&apos;s blog on Python, web servers written from scratch, async programming, and how software works under the hood.
</subtitle><author><name>Eduardo Vieira</name></author><entry><title type="html">Writing a Python Web Server From Scratch - Part 2: WebSocket</title><link href="https://eduardovra.github.io/writing-a-python-web-server-from-scratch-part-2-websocket/" rel="alternate" type="text/html" title="Writing a Python Web Server From Scratch - Part 2: WebSocket" /><published>2021-09-05T03:00:00+00:00</published><updated>2021-09-05T03:00:00+00:00</updated><id>https://eduardovra.github.io/writing-a-python-web-server-from-scratch-part-2-websocket</id><content type="html" xml:base="https://eduardovra.github.io/writing-a-python-web-server-from-scratch-part-2-websocket/"><![CDATA[<p>Following the first <a href="/writing-a-python-web-server-from-scratch-part-1-http/">Post</a> on the “Writing My Own Web Server” series, now we’re going to find out more about the WebSocket protocol.</p>

<p>It allows applications to establish a persistent full-duplex connection between server and client, and this enables a series of interesting possibilities.</p>

<p>As always, you can choose to jump right into the <a href="https://github.com/eduardovra/simple-asgi-webserver">repository</a> and see the code for yourself or read this article before. It’s up to you.</p>

<h3 id="websocket-use-cases">WebSocket use cases</h3>

<p>Any web application that needs some kind of real-time interactivity can benefit from the use of WebSockets. Bellow, there’s a list with some areas:</p>

<ul>
  <li>Chatting</li>
  <li>Online games</li>
  <li>Financial applications</li>
  <li>Social feeds (for news, tweets, etc)</li>
  <li>Collaborative editing of documents</li>
</ul>

<p>As of today, all modern browsers support the WebSocket protocol.</p>

<h3 id="creating-a-test-application">Creating a test application</h3>

<p>My goal with this project was to get a basic Websocket echo server working. This is basically the same example that the <a href="https://fastapi.tiangolo.com">FastAPI</a> project provides to showcase how to use websockets with the framework.</p>

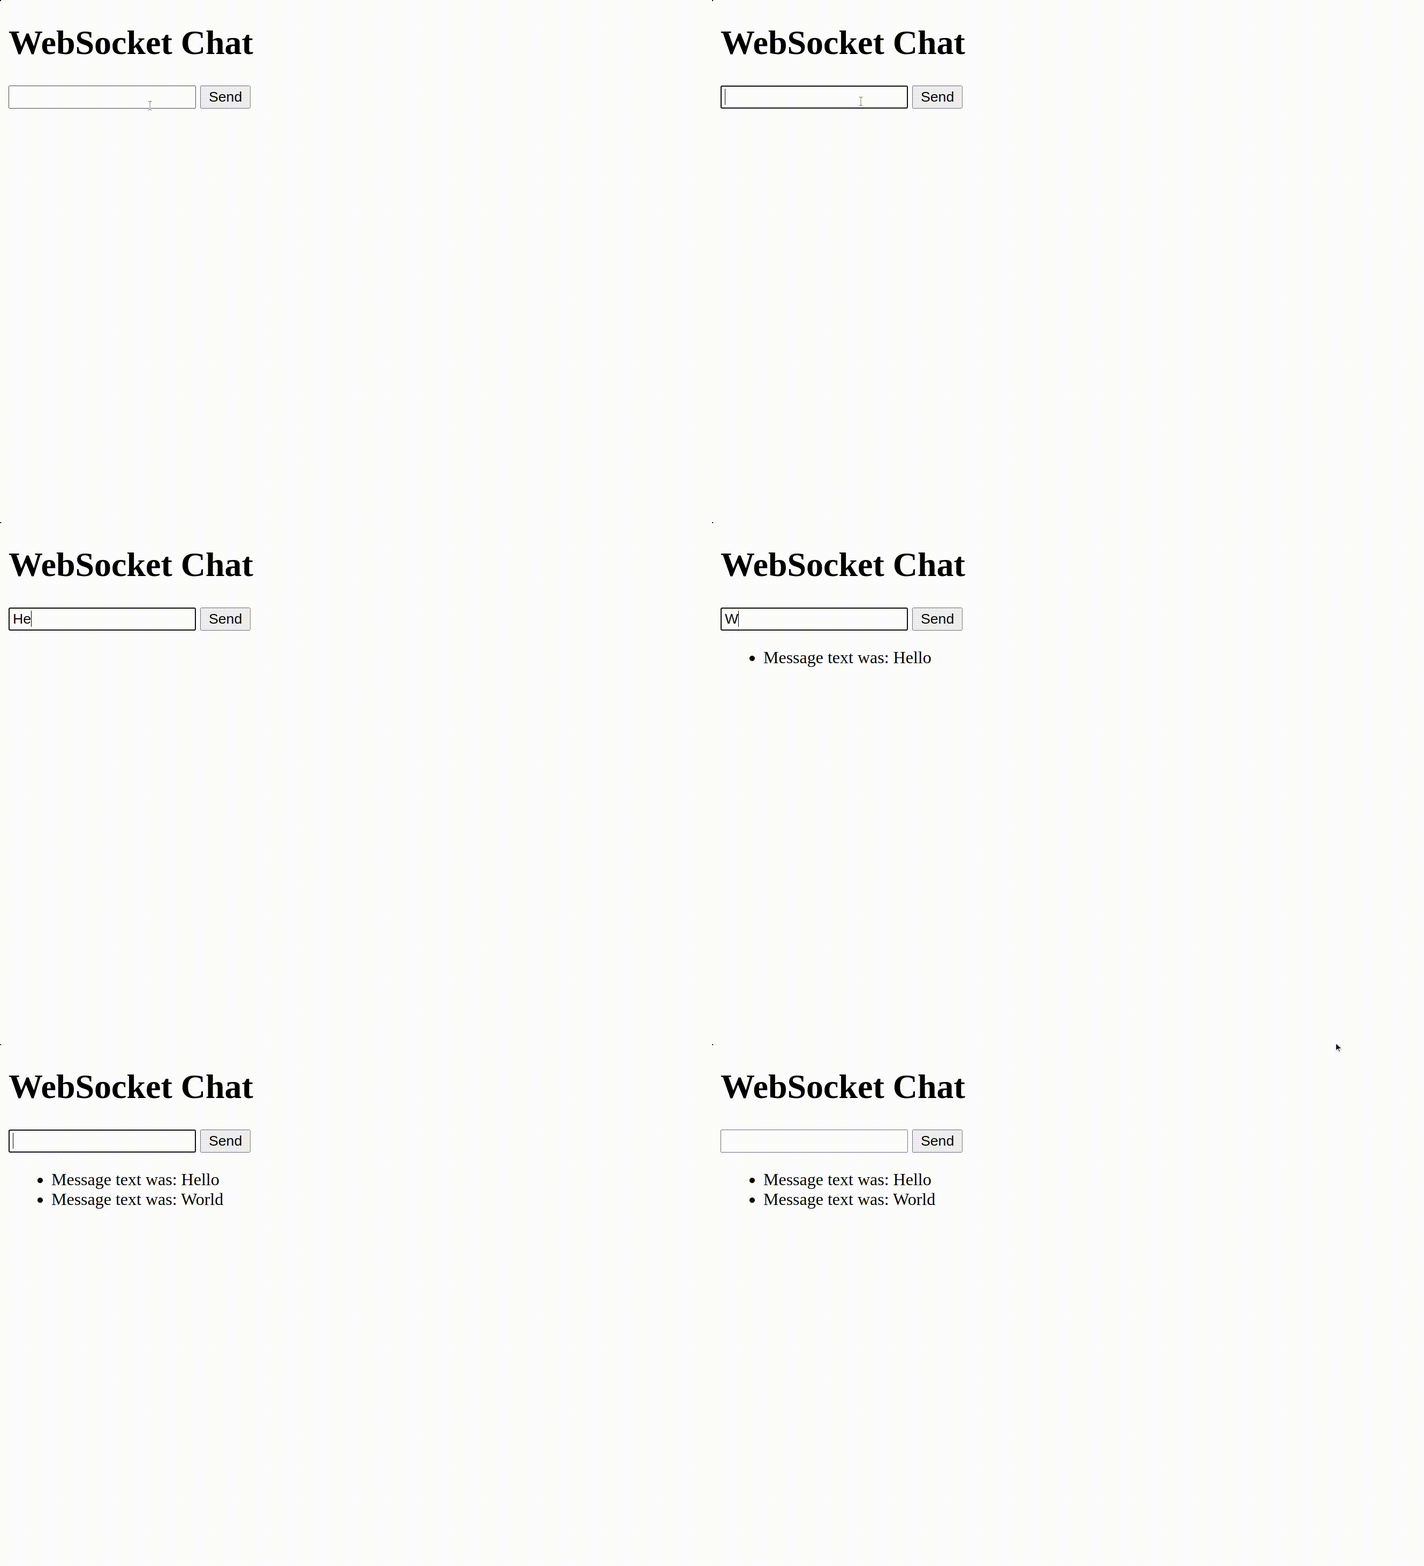
<p>An input field is presented for the user to type some text, and when its contents are sent by the client, the server echos it back. The client appends each response of the server on the screen.</p>

<div class="language-python highlighter-rouge"><div class="highlight"><pre class="highlight"><code><span class="kn">from</span> <span class="n">fastapi</span> <span class="kn">import</span> <span class="n">FastAPI</span><span class="p">,</span> <span class="n">WebSocket</span>
<span class="kn">from</span> <span class="n">fastapi.responses</span> <span class="kn">import</span> <span class="n">HTMLResponse</span>

<span class="kn">import</span> <span class="n">server</span> <span class="k">as</span> <span class="n">uvicorn</span>

<span class="n">app</span> <span class="o">=</span> <span class="nc">FastAPI</span><span class="p">()</span>

<span class="nd">@app.get</span><span class="p">(</span><span class="sh">"</span><span class="s">/</span><span class="sh">"</span><span class="p">)</span>
<span class="k">async</span> <span class="k">def</span> <span class="nf">root</span><span class="p">():</span>
    <span class="c1"># Setup basic page structure and JS to handle the WS connection
</span>    <span class="n">html</span> <span class="o">=</span> <span class="sh">"""</span><span class="s">&lt;html&gt;&lt;/html&gt;</span><span class="sh">"""</span>  <span class="c1"># The complete HTML is in the repo
</span>    <span class="k">return</span> <span class="nc">HTMLResponse</span><span class="p">(</span><span class="n">html</span><span class="p">)</span>

<span class="nd">@app.websocket</span><span class="p">(</span><span class="sh">"</span><span class="s">/ws</span><span class="sh">"</span><span class="p">)</span>
<span class="k">async</span> <span class="k">def</span> <span class="nf">websocket_endpoint</span><span class="p">(</span><span class="n">websocket</span><span class="p">:</span> <span class="n">WebSocket</span><span class="p">):</span>
    <span class="k">await</span> <span class="n">websocket</span><span class="p">.</span><span class="nf">accept</span><span class="p">()</span>
    <span class="k">while</span> <span class="bp">True</span><span class="p">:</span>
        <span class="n">data</span> <span class="o">=</span> <span class="k">await</span> <span class="n">websocket</span><span class="p">.</span><span class="nf">receive_text</span><span class="p">()</span>
        <span class="k">await</span> <span class="n">websocket</span><span class="p">.</span><span class="nf">send_text</span><span class="p">(</span><span class="sa">f</span><span class="sh">"</span><span class="s">Message text was: </span><span class="si">{</span><span class="n">data</span><span class="si">}</span><span class="sh">"</span><span class="p">)</span>

<span class="k">if</span> <span class="n">__name__</span> <span class="o">==</span> <span class="sh">"</span><span class="s">__main__</span><span class="sh">"</span><span class="p">:</span>
    <span class="n">uvicorn</span><span class="p">.</span><span class="nf">run</span><span class="p">(</span><span class="n">app</span><span class="p">,</span> <span class="n">host</span><span class="o">=</span><span class="sh">"</span><span class="s">127.0.0.1</span><span class="sh">"</span><span class="p">,</span> <span class="n">port</span><span class="o">=</span><span class="mi">8000</span><span class="p">)</span>
</code></pre></div></div>

<p><img src="/assets/img/ws-chat.gif" alt="A gif showing the websocket chat application working" /></p>

<h3 id="how-the-protocol-works">How the protocol works</h3>

<p>The process of connection starts with the handshaking phase.</p>

<h4 id="handshake">Handshake</h4>

<p>After connecting to the server, the client sends a regular HTTP GET request with some special headers to denote its intention of upgrading the connection to the WebSocket mode.</p>

<div class="language-plaintext highlighter-rouge"><div class="highlight"><pre class="highlight"><code>GET /chat HTTP/1.1
Upgrade: websocket
Connection: Upgrade
Sec-WebSocket-Key: dGhlIHNhbXBsZSBub25jZQ==
Sec-WebSocket-Version: 13
</code></pre></div></div>

<p>At this point, the server might either accept or refuse the upgrade attempt. In order to accept, it must return a response with the following format:</p>

<div class="language-plaintext highlighter-rouge"><div class="highlight"><pre class="highlight"><code>HTTP/1.1 101 Switching Protocols
Upgrade: websocket
Connection: Upgrade
Sec-WebSocket-Accept: s3pPLMBiTxaQ9kYGzzhZRbK+xOo=
</code></pre></div></div>

<h4 id="frame-format">Frame format</h4>

<p>Once the handshake is done, the communication channel switches to using a standard binary frame format to exchange messages:</p>

<div class="language-plaintext highlighter-rouge"><div class="highlight"><pre class="highlight"><code> 0                   1                   2                   3
 0 1 2 3 4 5 6 7 8 9 0 1 2 3 4 5 6 7 8 9 0 1 2 3 4 5 6 7 8 9 0 1
+-+-+-+-+-------+-+-------------+-------------------------------+
|F|R|R|R| opcode|M| Payload len |    Extended payload length    |
|I|S|S|S|  (4)  |A|     (7)     |             (16/64)           |
|N|V|V|V|       |S|             |   (if payload len==126/127)   |
| |1|2|3|       |K|             |                               |
+-+-+-+-+-------+-+-------------+ - - - - - - - - - - - - - - - +
|     Extended payload length continued, if payload len == 127  |
+ - - - - - - - - - - - - - - - +-------------------------------+
|                               |Masking-key, if MASK set to 1  |
+-------------------------------+-------------------------------+
| Masking-key (continued)       |          Payload Data         |
+-------------------------------- - - - - - - - - - - - - - - - +
:                     Payload Data continued ...                :
+ - - - - - - - - - - - - - - - - - - - - - - - - - - - - - - - +
|                     Payload Data continued ...                |
+---------------------------------------------------------------+
</code></pre></div></div>

<p>The frame contains several flags and control fields which I’ll cover later. For now, let’s start by worrying about the <code class="language-plaintext highlighter-rouge">opcode</code> field only. It defines what kind of payload this frame carries. The most essential values are:</p>

<ul>
  <li><strong>0x1</strong>: Payload contains UTF-8 encoded text</li>
  <li><strong>0x2</strong>: Payload contains a binary string (a bytes array)</li>
  <li><strong>0x8</strong>: A control frame for connection close. Payload may contain the close status code</li>
</ul>

<h3 id="the-asgi-standard-for-websocket-connections">The ASGI standard for WebSocket connections</h3>

<h4 id="scope-format">Scope format</h4>

<p>The scope dictionary for Websocket connections follows the same format as HTTP connections, being the <code class="language-plaintext highlighter-rouge">"type"</code> used to distinguish them. Notice also that Websocket connections use a different schema format: instead of <em>http</em> and <em>https</em>, it uses <em>ws</em> and <em>wss</em> for standard and encrypted connections respectively.</p>

<div class="language-python highlighter-rouge"><div class="highlight"><pre class="highlight"><code><span class="p">{</span>
    <span class="sh">"</span><span class="s">type</span><span class="sh">"</span><span class="p">:</span> <span class="sh">"</span><span class="s">websocket</span><span class="sh">"</span><span class="p">,</span>
    <span class="sh">"</span><span class="s">asgi</span><span class="sh">"</span><span class="p">:</span> <span class="p">{</span><span class="sh">"</span><span class="s">version</span><span class="sh">"</span><span class="p">:</span> <span class="sh">"</span><span class="s">3.0</span><span class="sh">"</span><span class="p">},</span>
    <span class="sh">"</span><span class="s">http_version</span><span class="sh">"</span><span class="p">:</span> <span class="sh">"</span><span class="s">1.1</span><span class="sh">"</span><span class="p">,</span>
    <span class="sh">"</span><span class="s">scheme</span><span class="sh">"</span><span class="p">:</span> <span class="sh">"</span><span class="s">ws</span><span class="sh">"</span><span class="p">,</span> <span class="c1"># wss when using encrypted connection
</span>    <span class="sh">"</span><span class="s">path</span><span class="sh">"</span><span class="p">:</span> <span class="sh">"</span><span class="s">/ws</span><span class="sh">"</span><span class="p">,</span>
    <span class="sh">"</span><span class="s">query_string</span><span class="sh">"</span><span class="p">:</span> <span class="sa">b</span><span class="sh">"</span><span class="s">q=search</span><span class="sh">"</span><span class="p">,</span>
    <span class="sh">"</span><span class="s">headers</span><span class="sh">"</span><span class="p">:</span> <span class="p">[</span>
        <span class="p">[</span><span class="sa">b</span><span class="sh">"</span><span class="s">accept-language</span><span class="sh">"</span><span class="p">,</span> <span class="sa">b</span><span class="sh">"</span><span class="s">en-US,en;q=0.9,pt-BR;q=0.8,pt;q=0.7</span><span class="sh">"</span><span class="p">],</span>
    <span class="p">],</span>
<span class="p">}</span>
</code></pre></div></div>

<h4 id="event-types-sent-by-the-server">Event types sent by the server</h4>

<ul>
  <li><code class="language-plaintext highlighter-rouge">"websocket.connect"</code>: A client is attempting to establish a connection</li>
  <li><code class="language-plaintext highlighter-rouge">"websocket.receive"</code>: The client sent a data frame</li>
  <li><code class="language-plaintext highlighter-rouge">"websocket.disconnect"</code>: The client is closing the connection</li>
</ul>

<h4 id="event-types-sent-by-the-application">Event types sent by the application</h4>

<ul>
  <li><code class="language-plaintext highlighter-rouge">"websocket.accept"</code>: The application accepted the connection</li>
  <li><code class="language-plaintext highlighter-rouge">"websocket.send"</code>: The application is sending data</li>
  <li><code class="language-plaintext highlighter-rouge">"websocket.close"</code>: The application is closing the connection</li>
</ul>

<h3 id="extending-the-server-to-handle-websockets">Extending the server to handle WebSockets</h3>

<p>With this brief introduction of how the protocol works, let’s get into the server implementation. I’m going to show some snippets of the source code to demonstrate the general outline of the solution.</p>

<p>The first thing the server needs to do, upon receiving a connection request, is to determine its type. It can be either a regular HTTP request or a Weboscket connection. This can be done by inspecting the headers section, as described earlier.</p>

<div class="language-python highlighter-rouge"><div class="highlight"><pre class="highlight"><code><span class="k">async</span> <span class="k">def</span> <span class="nf">build_scope</span><span class="p">(</span><span class="n">reader</span><span class="p">):</span>
    <span class="c1"># ...
</span>
    <span class="nf">if </span><span class="p">(</span>
        <span class="n">method</span> <span class="o">==</span> <span class="sh">"</span><span class="s">GET</span><span class="sh">"</span>
        <span class="ow">and</span> <span class="sh">"</span><span class="s">Upgrade</span><span class="sh">"</span> <span class="ow">in</span> <span class="n">dict_headers</span><span class="p">.</span><span class="nf">get</span><span class="p">(</span><span class="sh">"</span><span class="s">connection</span><span class="sh">"</span><span class="p">,</span> <span class="sh">""</span><span class="p">)</span>
        <span class="ow">and</span> <span class="n">dict_headers</span><span class="p">.</span><span class="nf">get</span><span class="p">(</span><span class="sh">"</span><span class="s">upgrade</span><span class="sh">"</span><span class="p">)</span> <span class="o">==</span> <span class="sh">"</span><span class="s">websocket</span><span class="sh">"</span>
    <span class="p">):</span>
        <span class="n">sec_websocket_protocol</span> <span class="o">=</span> <span class="n">dict_headers</span><span class="p">.</span><span class="nf">get</span><span class="p">(</span><span class="sh">"</span><span class="s">sec-websocket-protocol</span><span class="sh">"</span><span class="p">,</span> <span class="sh">""</span><span class="p">)</span>
        <span class="n">subprotocols</span> <span class="o">=</span> <span class="p">[</span><span class="n">proto</span><span class="p">.</span><span class="nf">strip</span><span class="p">()</span> <span class="k">for</span> <span class="n">proto</span> <span class="ow">in</span> <span class="n">sec_websocket_protocol</span><span class="p">.</span><span class="nf">split</span><span class="p">(</span><span class="sh">"</span><span class="s">,</span><span class="sh">"</span><span class="p">)]</span>
        <span class="n">scope</span><span class="p">.</span><span class="nf">update</span><span class="p">({</span><span class="sh">"</span><span class="s">type</span><span class="sh">"</span><span class="p">:</span> <span class="sh">"</span><span class="s">websocket</span><span class="sh">"</span><span class="p">,</span> <span class="sh">"</span><span class="s">subprotocols</span><span class="sh">"</span><span class="p">:</span> <span class="n">subprotocols</span><span class="p">})</span>
    <span class="k">else</span><span class="p">:</span>
        <span class="n">scope</span><span class="p">.</span><span class="nf">update</span><span class="p">({</span><span class="sh">"</span><span class="s">type</span><span class="sh">"</span><span class="p">:</span> <span class="sh">"</span><span class="s">http</span><span class="sh">"</span><span class="p">,</span> <span class="sh">"</span><span class="s">method</span><span class="sh">"</span><span class="p">:</span> <span class="n">method</span><span class="p">})</span>

    <span class="k">return</span> <span class="n">scope</span>
</code></pre></div></div>

<p>With the request <strong>scope</strong> assembled, the server can invoke the appropriate handler, being either <code class="language-plaintext highlighter-rouge">http_handler</code> or <code class="language-plaintext highlighter-rouge">websocket_handler</code>, and yield control to the application.</p>

<div class="language-python highlighter-rouge"><div class="highlight"><pre class="highlight"><code><span class="k">async</span> <span class="k">def</span> <span class="nf">handler</span><span class="p">(</span><span class="n">app</span><span class="p">,</span> <span class="n">reader</span><span class="p">:</span> <span class="n">asyncio</span><span class="p">.</span><span class="n">StreamReader</span><span class="p">,</span> <span class="n">writer</span><span class="p">:</span> <span class="n">asyncio</span><span class="p">.</span><span class="n">StreamWriter</span><span class="p">):</span>
    <span class="n">scope</span> <span class="o">=</span> <span class="k">await</span> <span class="nf">build_scope</span><span class="p">(</span><span class="n">reader</span><span class="p">)</span>

    <span class="k">if</span> <span class="n">scope</span><span class="p">[</span><span class="sh">"</span><span class="s">type</span><span class="sh">"</span><span class="p">]</span> <span class="o">==</span> <span class="sh">"</span><span class="s">http</span><span class="sh">"</span><span class="p">:</span>
        <span class="k">await</span> <span class="nf">http_handler</span><span class="p">(</span><span class="n">app</span><span class="p">,</span> <span class="n">scope</span><span class="p">,</span> <span class="n">reader</span><span class="p">,</span> <span class="n">writer</span><span class="p">)</span>
    <span class="k">elif</span> <span class="n">scope</span><span class="p">[</span><span class="sh">"</span><span class="s">type</span><span class="sh">"</span><span class="p">]</span> <span class="o">==</span> <span class="sh">"</span><span class="s">websocket</span><span class="sh">"</span><span class="p">:</span>
        <span class="k">await</span> <span class="nf">websocket_handler</span><span class="p">(</span><span class="n">app</span><span class="p">,</span> <span class="n">scope</span><span class="p">,</span> <span class="n">reader</span><span class="p">,</span> <span class="n">writer</span><span class="p">)</span>
</code></pre></div></div>

<p>For the purposes of this post, we’re gonna focus on the Websocket handler only. Details about the HTTP handler were already discussed in the previous <a href="/writing-a-python-web-server-from-scratch-part-1-http/">article</a>.</p>

<h3 id="the-websocket-handler">The Websocket handler</h3>

<p>As the ASGI standard states, a websocket server must provide the <code class="language-plaintext highlighter-rouge">receive()</code> and <code class="language-plaintext highlighter-rouge">send()</code> methods alongside the <code class="language-plaintext highlighter-rouge">scope</code> dictionary to the application. This is the same as the HTTP server implementation, but the main difference we have to account for here is the stateful nature of the connection.</p>

<p>That means, there is the possibility of multiple messages being exchanged between the server and client across the lifetime of a single connection. Also, each message sent by one of the parties doesn’t require the other party to send any kind of response.</p>

<p>When we consider this, the separation of send and receive cycles proposed by the ASGI standard start making much more sense.</p>

<p>The basic layout of the coroutine is as follows.</p>

<div class="language-python highlighter-rouge"><div class="highlight"><pre class="highlight"><code><span class="k">async</span> <span class="k">def</span> <span class="nf">websocket_handler</span><span class="p">(</span><span class="n">app</span><span class="p">,</span> <span class="n">scope</span><span class="p">,</span> <span class="n">reader</span><span class="p">,</span> <span class="n">writer</span><span class="p">):</span>
    <span class="k">async</span> <span class="k">def</span> <span class="nf">receive</span><span class="p">():</span>
        <span class="c1"># ...
</span>        <span class="k">return</span> <span class="n">event</span>

    <span class="k">async</span> <span class="k">def</span> <span class="nf">send</span><span class="p">(</span><span class="n">event</span><span class="p">):</span>
        <span class="c1"># ...
</span>
    <span class="c1"># Invoke the app!
</span>    <span class="k">await</span> <span class="nf">app</span><span class="p">(</span><span class="n">scope</span><span class="p">,</span> <span class="n">receive</span><span class="p">,</span> <span class="n">send</span><span class="p">)</span>
</code></pre></div></div>

<p>It all starts with the handshaking process. Let’s check it out.</p>

<h4 id="finishing-the-handshake-process">Finishing the handshake process</h4>

<p>The first time <code class="language-plaintext highlighter-rouge">receive()</code> is called by the application, a <code class="language-plaintext highlighter-rouge">"websocket.connect"</code> event is returned to denote the beginning of the handshake process. At this point, the app can either accept or deny the connection by sending a <code class="language-plaintext highlighter-rouge">"websocket.accept"</code> or <code class="language-plaintext highlighter-rouge">"websocket.close"</code> event, respectively.</p>

<p>Once the upgrade is accepted and the handshake process is finished, both parties will start exchanging messages in the new binary frame format. These frames can carry control or data messages, and in the case of data messages, the payload’s format can be either text or binary.</p>

<h4 id="frame-header-parsing">Frame header parsing</h4>

<p>Now it’s the time we’re gonna have to play with Python’s capabilities for handling binary data. To parse the frame headers, I’ve chosen to use the built-in <code class="language-plaintext highlighter-rouge">struct</code> module.</p>

<p>For example, in the code section below, the module is used to get some control flags, the frame type opcode, and the payload length.</p>

<div class="language-python highlighter-rouge"><div class="highlight"><pre class="highlight"><code><span class="k">async</span> <span class="k">def</span> <span class="nf">read_websocket_frame</span><span class="p">(</span><span class="n">reader</span><span class="p">):</span>
    <span class="c1"># Read frame header
</span>    <span class="n">header</span> <span class="o">=</span> <span class="k">await</span> <span class="n">reader</span><span class="p">.</span><span class="nf">read</span><span class="p">(</span><span class="mi">2</span><span class="p">)</span>

    <span class="n">unpacked</span> <span class="o">=</span> <span class="n">struct</span><span class="p">.</span><span class="nf">unpack</span><span class="p">(</span><span class="sh">"</span><span class="s">&lt;BB</span><span class="sh">"</span><span class="p">,</span> <span class="n">header</span><span class="p">)</span>
    <span class="n">fin</span> <span class="o">=</span> <span class="p">(</span><span class="n">unpacked</span><span class="p">[</span><span class="mi">0</span><span class="p">]</span> <span class="o">&amp;</span> <span class="p">(</span><span class="mi">1</span> <span class="o">&lt;&lt;</span> <span class="mi">7</span><span class="p">))</span> <span class="o">&gt;</span> <span class="mi">0</span>
    <span class="n">opcode</span> <span class="o">=</span> <span class="n">unpacked</span><span class="p">[</span><span class="mi">0</span><span class="p">]</span> <span class="o">&amp;</span> <span class="mh">0x0F</span>
    <span class="n">mask</span> <span class="o">=</span> <span class="p">(</span><span class="n">unpacked</span><span class="p">[</span><span class="mi">1</span><span class="p">]</span> <span class="o">&amp;</span> <span class="p">(</span><span class="mi">1</span> <span class="o">&lt;&lt;</span> <span class="mi">7</span><span class="p">))</span> <span class="o">&gt;</span> <span class="mi">0</span>
    <span class="n">payload_len</span> <span class="o">=</span> <span class="n">unpacked</span><span class="p">[</span><span class="mi">1</span><span class="p">]</span> <span class="o">&amp;</span> <span class="mh">0x7F</span>

    <span class="c1"># ...
</span></code></pre></div></div>

<p>There is a catch with the payload length that you can check on the complete version of the code. Basically, if the length is greater than 125, which accounts for the 7-bit size limitation of the field, the server needs to read the real payload length from another region. In that case, the field can have either 2, or 8 bytes in size.</p>

<div class="language-python highlighter-rouge"><div class="highlight"><pre class="highlight"><code><span class="k">async</span> <span class="k">def</span> <span class="nf">read_websocket_frame</span><span class="p">(</span><span class="n">reader</span><span class="p">):</span>
    <span class="c1"># ...
</span>
    <span class="k">if</span> <span class="n">payload_len</span> <span class="o">==</span> <span class="mi">126</span><span class="p">:</span>
        <span class="n">l</span> <span class="o">=</span> <span class="k">await</span> <span class="n">reader</span><span class="p">.</span><span class="nf">read</span><span class="p">(</span><span class="mi">2</span><span class="p">)</span>
        <span class="n">u</span> <span class="o">=</span> <span class="n">struct</span><span class="p">.</span><span class="nf">unpack</span><span class="p">(</span><span class="sh">"</span><span class="s">&lt;H</span><span class="sh">"</span><span class="p">,</span> <span class="n">l</span><span class="p">)</span>
        <span class="n">payload_len</span> <span class="o">=</span> <span class="n">u</span><span class="p">[</span><span class="mi">0</span><span class="p">]</span>
    <span class="k">elif</span> <span class="n">payload_len</span> <span class="o">==</span> <span class="mi">127</span><span class="p">:</span>
        <span class="n">l</span> <span class="o">=</span> <span class="k">await</span> <span class="n">reader</span><span class="p">.</span><span class="nf">read</span><span class="p">(</span><span class="mi">8</span><span class="p">)</span>
        <span class="n">u</span> <span class="o">=</span> <span class="n">struct</span><span class="p">.</span><span class="nf">unpack</span><span class="p">(</span><span class="sh">"</span><span class="s">&lt;Q</span><span class="sh">"</span><span class="p">,</span> <span class="n">l</span><span class="p">)</span>
        <span class="n">payload_len</span> <span class="o">=</span> <span class="n">u</span><span class="p">[</span><span class="mi">0</span><span class="p">]</span>

    <span class="c1"># ...
</span></code></pre></div></div>

<h4 id="payload-masking">Payload masking</h4>

<p>When receiving messages from the client, the server expects their payloads to be masked using XOR encryption. Before delivering this data to the application we must read the masking key and decrypt it.</p>

<div class="language-python highlighter-rouge"><div class="highlight"><pre class="highlight"><code><span class="k">async</span> <span class="k">def</span> <span class="nf">read_websocket_frame</span><span class="p">(</span><span class="n">reader</span><span class="p">):</span>
    <span class="c1"># ...
</span>
    <span class="k">if</span> <span class="n">mask</span><span class="p">:</span>
        <span class="n">masking_key</span> <span class="o">=</span> <span class="k">await</span> <span class="n">reader</span><span class="p">.</span><span class="nf">read</span><span class="p">(</span><span class="mi">4</span><span class="p">)</span>

    <span class="n">payload</span> <span class="o">=</span> <span class="k">await</span> <span class="n">reader</span><span class="p">.</span><span class="nf">read</span><span class="p">(</span><span class="n">payload_len</span><span class="p">)</span>

    <span class="k">if</span> <span class="n">mask</span><span class="p">:</span>
        <span class="n">payload</span> <span class="o">=</span> <span class="nf">bytes</span><span class="p">(</span><span class="n">payload</span><span class="p">[</span><span class="n">i</span><span class="p">]</span> <span class="o">^</span> <span class="n">masking_key</span><span class="p">[</span><span class="n">i</span> <span class="o">%</span> <span class="mi">4</span><span class="p">]</span> <span class="k">for</span> <span class="n">i</span> <span class="ow">in</span> <span class="nf">range</span><span class="p">(</span><span class="nf">len</span><span class="p">(</span><span class="n">payload</span><span class="p">)))</span>

    <span class="k">return</span> <span class="n">fin</span><span class="p">,</span> <span class="n">opcode</span><span class="p">,</span> <span class="n">payload</span>
</code></pre></div></div>

<h4 id="handling-the-opcodes">Handling the opcodes</h4>

<p>As we are only supporting 3 different opcodes, the implementation is pretty straightforward. Just bear in mind that we need to decode the contents of the payload when dealing with messages in <code class="language-plaintext highlighter-rouge">"text"</code> format.</p>

<div class="language-python highlighter-rouge"><div class="highlight"><pre class="highlight"><code><span class="k">async</span> <span class="k">def</span> <span class="nf">websocket_handler</span><span class="p">(</span><span class="n">app</span><span class="p">,</span> <span class="n">scope</span><span class="p">,</span> <span class="n">reader</span><span class="p">,</span> <span class="n">writer</span><span class="p">):</span>
    <span class="c1"># ...
</span>
    <span class="k">if</span> <span class="n">opcode</span> <span class="o">==</span> <span class="mi">1</span><span class="p">:</span>
        <span class="n">event</span> <span class="o">=</span> <span class="p">{</span><span class="sh">"</span><span class="s">type</span><span class="sh">"</span><span class="p">:</span> <span class="sh">"</span><span class="s">websocket.receive</span><span class="sh">"</span><span class="p">,</span> <span class="sh">"</span><span class="s">text</span><span class="sh">"</span><span class="p">:</span> <span class="n">payload</span><span class="p">.</span><span class="nf">decode</span><span class="p">()}</span>
    <span class="k">elif</span> <span class="n">opcode</span> <span class="o">==</span> <span class="mi">2</span><span class="p">:</span>
        <span class="n">event</span> <span class="o">=</span> <span class="p">{</span><span class="sh">"</span><span class="s">type</span><span class="sh">"</span><span class="p">:</span> <span class="sh">"</span><span class="s">websocket.receive</span><span class="sh">"</span><span class="p">,</span> <span class="sh">"</span><span class="s">bytes</span><span class="sh">"</span><span class="p">:</span> <span class="n">payload</span><span class="p">}</span>
    <span class="k">elif</span> <span class="n">opcode</span> <span class="o">==</span> <span class="mi">8</span><span class="p">:</span>
        <span class="n">close_code</span> <span class="o">=</span> <span class="mi">1005</span>  <span class="c1"># Default
</span>        <span class="k">if</span> <span class="nf">len</span><span class="p">(</span><span class="n">payload</span><span class="p">):</span>
            <span class="n">u</span> <span class="o">=</span> <span class="n">struct</span><span class="p">.</span><span class="nf">unpack</span><span class="p">(</span><span class="sh">"</span><span class="s">&gt;H</span><span class="sh">"</span><span class="p">,</span> <span class="n">payload</span><span class="p">)</span>
            <span class="n">close_code</span> <span class="o">=</span> <span class="n">u</span><span class="p">[</span><span class="mi">0</span><span class="p">]</span>
        <span class="k">return</span> <span class="p">{</span><span class="sh">"</span><span class="s">type</span><span class="sh">"</span><span class="p">:</span> <span class="sh">"</span><span class="s">websocket.disconnect</span><span class="sh">"</span><span class="p">,</span> <span class="sh">"</span><span class="s">code</span><span class="sh">"</span><span class="p">:</span> <span class="n">close_code</span><span class="p">}</span>

    <span class="c1"># ...
</span></code></pre></div></div>

<h4 id="messages-fragmentation">Messages fragmentation</h4>

<p>Just as a side note, the protocol allows for messages to be fragmented among consecutive frames, this is what the FIN flag is used for. We’re not going to support this though.</p>

<h3 id="the-send-cycle">The send cycle</h3>

<p>All we’ve covered by now was related to the process of the server receiving messages and delivering them to the application.</p>

<p>On the other hand, when the app sends messages to the client, a very similar process happens.</p>

<p>As there was nothing particularly interesting or new about the implementation of this part, I’ll leave it to the reader to check this out directly in the <a href="https://github.com/eduardovra/simple-asgi-webserver">repository</a>.</p>

<h3 id="conclusion">Conclusion</h3>

<p>With this post, I’ve concluded the <em>Building My Own Web Server</em> series. The code presented here, despite not being a full-blown Websocket server, was all I had to do to get a working echo server in Chrome.</p>

<p>Hopefully, the information and insights provided can be helpful to demystify what happens under the hood when your web app interacts with the browser. There is nothing magical about this process, and you don’t need to be a wizard to be able to understand it.</p>

<p>I recommend checking out the references below if you want to know more the subject.</p>

<h3 id="references">References</h3>

<ul>
  <li><a href="https://developer.mozilla.org/en-US/docs/Web/API/WebSockets_API/Writing_WebSocket_servers">An awesome guide from Mozilla explaining how to implement the protocol</a></li>
  <li><a href="https://datatracker.ietf.org/doc/html/rfc6455">RFC for The WebSocket Protocol</a></li>
  <li><a href="https://github.com/django/asgiref/tree/3.0">ASGI Version 3.0</a></li>
</ul>]]></content><author><name>Eduardo Vieira</name></author><category term="python" /><category term="asyncio" /><category term="asgi" /><category term="http" /><category term="websocket" /><summary type="html"><![CDATA[This is the second part of a series of posts detailing how I built a Python Web Server supporting HTTP and WebSocket protocols from scratch.]]></summary></entry><entry><title type="html">Writing a Python Web Server From Scratch - Part 1: HTTP</title><link href="https://eduardovra.github.io/writing-a-python-web-server-from-scratch-part-1-http/" rel="alternate" type="text/html" title="Writing a Python Web Server From Scratch - Part 1: HTTP" /><published>2021-06-28T03:00:00+00:00</published><updated>2021-06-28T03:00:00+00:00</updated><id>https://eduardovra.github.io/writing-a-python-web-server-from-scratch-part-1-http</id><content type="html" xml:base="https://eduardovra.github.io/writing-a-python-web-server-from-scratch-part-1-http/"><![CDATA[<p>In this series of posts, I’ll discuss why and how I built a fully functional Web Server, supporting both HTTP and WebSocket protocols. This server has been written totally in Python, with no external dependencies, and it’s only about 200 lines of code. It’s meant to be used for running <a href="https://asgi.readthedocs.io/en/latest/index.html">ASGI</a> applications, so it’s compatible with frameworks like <a href="https://github.com/tiangolo/fastapi">FastAPI</a> and <a href="https://github.com/pgjones/quart">Quart</a>.</p>

<p>TL;DR <a href="https://github.com/eduardovra/simple-asgi-webserver">Here</a> is the repository with the complete implementation.</p>

<p>It’s important to mention that a program that small was only possible due to the focus on simplicity it was given. If it were to be 100% compliant to the standards and also worrying about performance and security, this would be another story.</p>

<p>Having taken this out of the way, if you’re interested in knowing what’s happening under the surface when writing your web apps, this article is for you.</p>

<p>But first, let’s take a walk on the philosophical side, and reflect on why this kind of project can be a good idea.</p>

<h3 id="whats-the-point-of-reinventing-the-wheel-">What’s the point of reinventing the wheel ?</h3>

<p>Most people underestimate the importance of practicing and reading good code to enhance your skills as a developer. But the reality is, being developers, we have access to thousands of open-source projects, and they are good opportunities to discover very clever ways of using programming languages to solve real problems. Nevertheless, randomly sweeping GitHub repositories to read code is not something that ever worked for me, hence, the idea of creating an application was something that helped me focus the research efforts.</p>

<p>Personally, I find it more productive to focus on more recent codebases, for example, <a href="https://github.com/encode/starlette">Starlette</a>. If you dig into it, you’ll find cool ideas. Besides, its code is not so difficult to read, compared with older projects like <a href="https://github.com/pallets/flask">Flask</a>, which carry the burden of maintaining compatibility and supporting multiple versions of Python over time.</p>

<p>My interest here was to get a more in-depth understanding of web protocols, particularly WebSockets, and also to see how Async programming is being used in the real world. This project was never a commitment to creating some production-ready server, but instead, something that I did to carve knowledge, practice programming and have fun. That said, I think not every code your write must be a piece of art, and you shouldn’t be afraid of creating something humble that just serves the sole purpose of getting better. Sometimes your attention should be more focused on the process and less on the outcome.</p>

<p>But for the record, I totally agree that it’s usually not a good idea to reinvent the wheel in your job.</p>

<h3 id="defining-goals">Defining goals</h3>

<p>For this project, I didn’t want to set strict rules or milestones. Instead, the basic goal was to build something that worked, drawing inspiration from other projects. The approach was basically to get an MVP of the server, then iterate again, and again, adding more features each time. And I intended to keep this process as long as I was still getting value out of it. I got the ball rolling by defining the base case that the server should be able to handle.</p>

<p>Consider the following application:</p>

<div class="language-python highlighter-rouge"><div class="highlight"><pre class="highlight"><code><span class="kn">import</span> <span class="n">uvicorn</span>
<span class="kn">from</span> <span class="n">fastapi</span> <span class="kn">import</span> <span class="n">FastAPI</span>

<span class="n">app</span> <span class="o">=</span> <span class="nc">FastAPI</span><span class="p">()</span>

<span class="nd">@app.get</span><span class="p">(</span><span class="sh">"</span><span class="s">/</span><span class="sh">"</span><span class="p">)</span>
<span class="k">async</span> <span class="k">def</span> <span class="nf">root</span><span class="p">():</span>
    <span class="k">return</span> <span class="p">{</span><span class="sh">"</span><span class="s">message</span><span class="sh">"</span><span class="p">:</span> <span class="sh">"</span><span class="s">Hello World</span><span class="sh">"</span><span class="p">}</span>

<span class="k">if</span> <span class="n">__name__</span> <span class="o">==</span> <span class="sh">"</span><span class="s">__main__</span><span class="sh">"</span><span class="p">:</span>
    <span class="n">uvicorn</span><span class="p">.</span><span class="nf">run</span><span class="p">(</span><span class="n">app</span><span class="p">,</span> <span class="n">host</span><span class="o">=</span><span class="sh">"</span><span class="s">0.0.0.0</span><span class="sh">"</span><span class="p">,</span> <span class="n">port</span><span class="o">=</span><span class="mi">8000</span><span class="p">)</span>
</code></pre></div></div>

<p>That was the simplest thing I could come up with in terms of functionality to support. Here, if we’re to mock <a href="https://github.com/encode/uvicorn">uvicorn’s</a> behavior, all we need to implement is a HTTP GET request/response cycle. Of course, the server will need an ASGI interface to communicate with the application as well. All thing considered, the job was basically creating a Python application that converts HTTP protocol messages to the ASGI interface, and vice-versa.</p>

<p>Let’s begin by having a look on how HTTP works.</p>

<h3 id="the-http-protocol">The HTTP protocol</h3>

<p>Luckily, <a href="https://developer.mozilla.org/en-US/docs/Web/HTTP">HTTP</a> is a text based protocol, and it’s fairly easy to parse. The basic format of the <em>Request</em> message is this:</p>

<div class="language-plaintext highlighter-rouge"><div class="highlight"><pre class="highlight"><code>GET / HTTP/1.1\r\n
Accept-Language: en-US,en;q=0.9,pt-BR;q=0.8,pt;q=0.7\r\n
User-Agent: Mozilla/5.0 Chrome/91.0.4472.114 Safari/537.36\r\n
\r\n
</code></pre></div></div>

<p>It’s composed of a series of lines, each of them terminated by a <code class="language-plaintext highlighter-rouge">\r\n</code> char sequence. The first line is called the <em>Request Line</em>. It contains the method, path and HTTP version used, and it’s often seen in apache’s <em>access_log</em> file. This is then followed by a list of headers, defined as key-value pairs separated by colons. The list is terminated by a blank line (also containing a <code class="language-plaintext highlighter-rouge">\r\n</code>). After the headers, an additional body portion may exists, depending on the kind of request (a Form POST for instance).</p>

<p>The layout of the <em>Response</em> is rather similar:</p>

<div class="language-plaintext highlighter-rouge"><div class="highlight"><pre class="highlight"><code>HTTP/1.1 200 OK\r\n
Content-Type: text/html; charset=UTF-8\r\n
Content-Length: 38\r\n
\r\n
&lt;html&gt;&lt;body&gt;Hello World!&lt;/body&gt;&lt;/html&gt;
</code></pre></div></div>

<p>The only difference would be the <em>Request Line</em> being replaced by a <em>Status Line</em>, that contains the status code for the response.</p>

<p>Now let’s see about the other end of the server: how to communicate with the application.</p>

<h3 id="the-asgi-standard">The ASGI standard</h3>

<p>The ASGI (Asynchronous Server Gateway Interface) standard establishes an interface for the server and application to communicate (by application I mean the Web Framework along with your code, considering the server sees it as only one thing).</p>

<p>An ASGI server is required to create the event loop and launch the application each time a connection is established. In terms of format, it expects the app to be a Callable that adheres to the following signature:</p>

<div class="language-python highlighter-rouge"><div class="highlight"><pre class="highlight"><code><span class="c1"># Implemented using a function...
</span><span class="k">async</span> <span class="k">def</span> <span class="nf">app</span><span class="p">(</span><span class="n">scope</span><span class="p">,</span> <span class="n">receive</span><span class="p">,</span> <span class="n">send</span><span class="p">):</span>
    <span class="bp">...</span>

<span class="c1"># ...or using a class
</span><span class="k">class</span> <span class="nc">FastAPI</span><span class="p">:</span>
    <span class="k">async</span> <span class="k">def</span> <span class="nf">__call__</span><span class="p">(</span><span class="n">self</span><span class="p">,</span> <span class="n">scope</span><span class="p">,</span> <span class="n">receive</span><span class="p">,</span> <span class="n">send</span><span class="p">):</span>
        <span class="bp">...</span>
</code></pre></div></div>

<p>Let’s break down these parameters.</p>

<h4 id="scope">Scope</h4>

<p>This is a dictionary containing details about the connection. For HTTP it will be like this:</p>

<div class="language-python highlighter-rouge"><div class="highlight"><pre class="highlight"><code><span class="p">{</span>
    <span class="sh">"</span><span class="s">type</span><span class="sh">"</span><span class="p">:</span> <span class="sh">"</span><span class="s">http</span><span class="sh">"</span><span class="p">:,</span>
    <span class="sh">"</span><span class="s">asgi</span><span class="sh">"</span> <span class="p">:</span> <span class="p">{</span><span class="sh">"</span><span class="s">version</span><span class="sh">"</span><span class="p">:</span> <span class="sh">"</span><span class="s">3.0</span><span class="sh">"</span><span class="p">},</span>
    <span class="sh">"</span><span class="s">http_version</span><span class="sh">"</span><span class="p">:</span> <span class="sh">"</span><span class="s">1.1</span><span class="sh">"</span><span class="p">,</span>
    <span class="sh">"</span><span class="s">method</span><span class="sh">"</span><span class="p">:</span> <span class="sh">"</span><span class="s">GET</span><span class="sh">"</span><span class="p">,</span>
    <span class="sh">"</span><span class="s">scheme</span><span class="sh">"</span><span class="p">:</span> <span class="sh">"</span><span class="s">https</span><span class="sh">"</span><span class="p">,</span>
    <span class="sh">"</span><span class="s">path</span><span class="sh">"</span><span class="p">:</span> <span class="sh">"</span><span class="s">/</span><span class="sh">"</span><span class="p">,</span>
    <span class="sh">"</span><span class="s">query_string</span><span class="sh">"</span><span class="p">:</span> <span class="sa">b</span><span class="sh">"</span><span class="s">q=search</span><span class="sh">"</span><span class="p">,</span>
    <span class="sh">"</span><span class="s">headers</span><span class="sh">"</span><span class="p">:</span> <span class="p">[</span>
        <span class="p">[</span><span class="sa">b</span><span class="sh">"</span><span class="s">accept-language</span><span class="sh">"</span><span class="p">,</span> <span class="sa">b</span><span class="sh">"</span><span class="s">en-US,en;q=0.9,pt-BR;q=0.8,pt;q=0.7</span><span class="sh">"</span><span class="p">],</span>
    <span class="p">],</span>
    <span class="c1"># ...
</span><span class="p">}</span>
</code></pre></div></div>

<p>Notice that some fields are presented as <em>unicode strings</em> (like <code class="language-plaintext highlighter-rouge">"method"</code>), and others are presented as <em>binary strings</em> (like <code class="language-plaintext highlighter-rouge">"query_string"</code>).</p>

<h4 id="receive">Receive</h4>

<p>This is a callback <em>coroutine</em> provided by the server to enable the application to receive events from the connection. The <em>coroutine</em> has no parameters and must return a dictionary with details about the event.</p>

<p>For HTTP connections, there’s only one event type that can be returned: <code class="language-plaintext highlighter-rouge">"http.request"</code>. It contains the payload of the request, and can be split among several parts. That means, the app might have to call <code class="language-plaintext highlighter-rouge">receive()</code> multiple times until an event with the <code class="language-plaintext highlighter-rouge">"more_body"</code> flag is received as <code class="language-plaintext highlighter-rouge">False</code>.</p>

<h4 id="send">Send</h4>

<p>It’s a callback <em>coroutine</em> as well, but it’s intended to be called by the application when it needs to send some data. This <em>coroutine</em> expects a dictionary to be provided as a parameter, containing details about the event being sent.</p>

<p>The send <em>coroutine</em> has two event types:</p>

<ul>
  <li><code class="language-plaintext highlighter-rouge">"http.response.start"</code> used by the app to send the response headers</li>
  <li><code class="language-plaintext highlighter-rouge">"http.response.body"</code> used by the app to send the body of the response. This event can be sent multiple times for chunked payloads, the same way as the event present on <code class="language-plaintext highlighter-rouge">receive()</code></li>
</ul>

<h3 id="the-request-response-cycle-in-asgi">The Request-Response cycle in ASGI</h3>

<p>The HTTP protocol operates on a basic Request-Response cycle. This means, the connection is always initiated by the client, and the server can only send data back once it’s requested.</p>

<p>The basic outline of a connection cycle happens like this:</p>

<ol>
  <li>The client (a Browser, usually), connects to the server, which promptly accepts it</li>
  <li>The client pushes the request data to the server
    <ul>
      <li>Once we get the headers in the server, we’re ready to build the connection scope and invoke the application</li>
      <li>At this point, the application can call the <code class="language-plaintext highlighter-rouge">receive()</code> function to get the body of the request (if any)</li>
    </ul>
  </li>
  <li>App calls <code class="language-plaintext highlighter-rouge">send()</code> function to send the response headers
    <ul>
      <li>The server saves the data but don’t pushes it yet</li>
    </ul>
  </li>
  <li>The app call the <code class="language-plaintext highlighter-rouge">send()</code> function once again to push the response body data. At this point, the server formats the HTTP response headers and pushes them through the socket along with the body</li>
  <li>When all the response data is sent, the server closes the connection</li>
  <li>At last, the application finishes its execution, and the control flow is returned to the server</li>
</ol>

<p>For now, you may find the ASGI interface separation of receive and send methods seeming to be overkill. But it was intentionally designed this way, and it will make much more sense when we’re implementing the WebSocket protocol.</p>

<p>Ok, so if you’re a programmer and have reached this point without seeing any code, your eyes must be bleeding by now. Then let’s get to it (finally).</p>

<h3 id="show-me-the-code">Show me the code</h3>

<p>The idea here is to create a Python module that can replace the <em>uvicorn’s</em> import statement, keeping the same behavior while serving the sample app.</p>

<p>For now, we’re only intending to support the HTTP protocol, therefore the MVP could be something like this:</p>

<div class="language-python highlighter-rouge"><div class="highlight"><pre class="highlight"><code><span class="kn">import</span> <span class="n">asyncio</span>

<span class="k">async</span> <span class="k">def</span> <span class="nf">handler</span><span class="p">(</span><span class="n">app</span><span class="p">,</span> <span class="n">reader</span><span class="p">:</span> <span class="n">asyncio</span><span class="p">.</span><span class="n">StreamReader</span><span class="p">,</span> <span class="n">writer</span><span class="p">:</span> <span class="n">asyncio</span><span class="p">.</span><span class="n">StreamWriter</span><span class="p">):</span>
    <span class="n">response_headers</span> <span class="o">=</span> <span class="p">[]</span>
    <span class="n">scope</span> <span class="o">=</span> <span class="k">await</span> <span class="nf">build_scope</span><span class="p">(</span><span class="n">reader</span><span class="p">)</span>

    <span class="k">async</span> <span class="k">def</span> <span class="nf">receive</span><span class="p">():</span>
        <span class="c1"># App's pulling the body of the request
</span>        <span class="n">content_length</span> <span class="o">=</span> <span class="nf">get_content_length</span><span class="p">(</span><span class="n">scope</span><span class="p">)</span>
        <span class="k">return</span> <span class="p">{</span>
            <span class="sh">"</span><span class="s">type</span><span class="sh">"</span><span class="p">:</span> <span class="sh">"</span><span class="s">http.request</span><span class="sh">"</span><span class="p">,</span>
            <span class="sh">"</span><span class="s">body</span><span class="sh">"</span><span class="p">:</span> <span class="k">await</span> <span class="n">reader</span><span class="p">.</span><span class="nf">read</span><span class="p">(</span><span class="n">content_length</span><span class="p">),</span>
            <span class="sh">"</span><span class="s">more_body</span><span class="sh">"</span><span class="p">:</span> <span class="bp">False</span><span class="p">,</span>
        <span class="p">}</span>

    <span class="k">async</span> <span class="k">def</span> <span class="nf">send</span><span class="p">(</span><span class="n">event</span><span class="p">):</span>
        <span class="k">nonlocal</span> <span class="n">response_headers</span>

        <span class="c1"># App's sending the response headers
</span>        <span class="k">if</span> <span class="n">event</span><span class="p">[</span><span class="sh">"</span><span class="s">type</span><span class="sh">"</span><span class="p">]</span> <span class="o">==</span> <span class="sh">"</span><span class="s">http.response.start</span><span class="sh">"</span><span class="p">:</span>
            <span class="n">response_headers</span> <span class="o">=</span> <span class="nf">build_http_headers</span><span class="p">(</span><span class="n">scope</span><span class="p">,</span> <span class="n">event</span><span class="p">)</span>
        <span class="c1"># App's sending the response body
</span>        <span class="k">elif</span> <span class="n">event</span><span class="p">[</span><span class="sh">"</span><span class="s">type</span><span class="sh">"</span><span class="p">]</span> <span class="o">==</span> <span class="sh">"</span><span class="s">http.response.body</span><span class="sh">"</span><span class="p">:</span>
            <span class="c1"># The headers should only be pushed once the body is received
</span>            <span class="k">if</span> <span class="n">response_headers</span><span class="p">:</span>
                <span class="n">writer</span><span class="p">.</span><span class="nf">writelines</span><span class="p">(</span><span class="n">response_headers</span><span class="p">)</span>
                <span class="n">response_headers</span> <span class="o">=</span> <span class="p">[]</span>

            <span class="n">writer</span><span class="p">.</span><span class="nf">write</span><span class="p">(</span><span class="n">event</span><span class="p">[</span><span class="sh">"</span><span class="s">body</span><span class="sh">"</span><span class="p">])</span>
            <span class="k">await</span> <span class="n">writer</span><span class="p">.</span><span class="nf">drain</span><span class="p">()</span>

            <span class="k">if</span> <span class="n">event</span><span class="p">.</span><span class="nf">get</span><span class="p">(</span><span class="sh">"</span><span class="s">more_body</span><span class="sh">"</span><span class="p">,</span> <span class="bp">False</span><span class="p">)</span> <span class="ow">is</span> <span class="bp">False</span><span class="p">:</span>
                <span class="c1"># Close connection
</span>                <span class="n">writer</span><span class="p">.</span><span class="nf">close</span><span class="p">()</span>
                <span class="k">await</span> <span class="n">writer</span><span class="p">.</span><span class="nf">wait_closed</span><span class="p">()</span>

    <span class="c1"># Invoke the app!
</span>    <span class="k">await</span> <span class="nf">app</span><span class="p">(</span><span class="n">scope</span><span class="p">,</span> <span class="n">receive</span><span class="p">,</span> <span class="n">send</span><span class="p">)</span>

<span class="k">async</span> <span class="k">def</span> <span class="nf">run_server</span><span class="p">(</span><span class="n">app</span><span class="p">,</span> <span class="n">host</span><span class="p">,</span> <span class="n">port</span><span class="p">):</span>
    <span class="k">async</span> <span class="k">def</span> <span class="nf">wrapped_handler</span><span class="p">(</span><span class="n">reader</span><span class="p">,</span> <span class="n">writer</span><span class="p">):</span>
        <span class="k">return</span> <span class="k">await</span> <span class="nf">handler</span><span class="p">(</span><span class="n">app</span><span class="p">,</span> <span class="n">reader</span><span class="p">,</span> <span class="n">writer</span><span class="p">)</span>

    <span class="n">server</span> <span class="o">=</span> <span class="k">await</span> <span class="n">asyncio</span><span class="p">.</span><span class="nf">start_server</span><span class="p">(</span><span class="n">wrapped_handler</span><span class="p">,</span> <span class="n">host</span><span class="p">,</span> <span class="n">port</span><span class="p">)</span>
    <span class="k">async</span> <span class="k">with</span> <span class="n">server</span><span class="p">:</span>
        <span class="k">await</span> <span class="n">server</span><span class="p">.</span><span class="nf">serve_forever</span><span class="p">()</span>

<span class="k">def</span> <span class="nf">run</span><span class="p">(</span><span class="n">app</span><span class="p">,</span> <span class="n">host</span><span class="p">,</span> <span class="n">port</span><span class="p">):</span>
    <span class="nf">print</span><span class="p">(</span><span class="sa">f</span><span class="sh">"</span><span class="s">Listening on http://</span><span class="si">{</span><span class="n">host</span><span class="si">}</span><span class="s">:</span><span class="si">{</span><span class="n">port</span><span class="si">}</span><span class="sh">"</span><span class="p">)</span>
    <span class="n">asyncio</span><span class="p">.</span><span class="nf">run</span><span class="p">(</span><span class="nf">run_server</span><span class="p">(</span><span class="n">app</span><span class="p">,</span> <span class="n">host</span><span class="p">,</span> <span class="n">port</span><span class="p">))</span>
</code></pre></div></div>

<p>Some functions were omitted for brevity, but as you can see, the implementation is quite small and easy to follow through. We leverage the <code class="language-plaintext highlighter-rouge">asyncio.start_server()</code> function to spawn a TCP server on the host and port selected by the user. Whenever a client connects to the server, the <code class="language-plaintext highlighter-rouge">handler()</code> <em>coroutine</em> is going to be called, and we use the <code class="language-plaintext highlighter-rouge">reader</code> and <code class="language-plaintext highlighter-rouge">writer</code> objects to interact with the underlying socket. It works pretty much as file IO.</p>

<p>An interesting factor is the usage of <em>inner functions</em> (also called <em>closures</em>). They inherit the context variables present in the parent function and therefore can hold state in-between calls. Sometimes make sense to use <em>inner functions</em> as an alternative to full-blown classes and objects.</p>

<p>Besides these details, the rest of the code is basically just about handling dictionaries and string manipulation.</p>

<h4 id="parsing-http-headers">Parsing HTTP headers</h4>

<p>These are the routines responsible for parsing the HTTP protocol headers and create the <code class="language-plaintext highlighter-rouge">scope</code> dictionary that is going to be provided for the app. I used the built-in module <code class="language-plaintext highlighter-rouge">urllib</code> to parse the URL and separate the path from the query_string.</p>

<div class="language-python highlighter-rouge"><div class="highlight"><pre class="highlight"><code><span class="kn">from</span> <span class="n">urllib.parse</span> <span class="kn">import</span> <span class="n">urlparse</span>

<span class="k">async</span> <span class="k">def</span> <span class="nf">build_scope_headers</span><span class="p">(</span><span class="n">reader</span><span class="p">):</span>
    <span class="n">headers</span> <span class="o">=</span> <span class="p">[]</span>

    <span class="k">while</span> <span class="bp">True</span><span class="p">:</span>
        <span class="n">header_line</span> <span class="o">=</span> <span class="k">await</span> <span class="n">reader</span><span class="p">.</span><span class="nf">readuntil</span><span class="p">(</span><span class="sa">b</span><span class="sh">"</span><span class="se">\r\n</span><span class="sh">"</span><span class="p">)</span>
        <span class="n">header</span> <span class="o">=</span> <span class="n">header_line</span><span class="p">.</span><span class="nf">rstrip</span><span class="p">()</span>
        <span class="k">if</span> <span class="ow">not</span> <span class="n">header</span><span class="p">:</span>
            <span class="k">break</span>
        <span class="n">key</span><span class="p">,</span> <span class="n">value</span> <span class="o">=</span> <span class="n">header</span><span class="p">.</span><span class="nf">split</span><span class="p">(</span><span class="sa">b</span><span class="sh">"</span><span class="s">: </span><span class="sh">"</span><span class="p">,</span> <span class="mi">1</span><span class="p">)</span>
        <span class="n">headers</span><span class="p">.</span><span class="nf">append</span><span class="p">([</span><span class="n">key</span><span class="p">.</span><span class="nf">lower</span><span class="p">(),</span> <span class="n">value</span><span class="p">])</span>

    <span class="k">return</span> <span class="n">headers</span>


<span class="k">async</span> <span class="k">def</span> <span class="nf">build_scope</span><span class="p">(</span><span class="n">reader</span><span class="p">):</span>
    <span class="n">request_line</span> <span class="o">=</span> <span class="k">await</span> <span class="n">reader</span><span class="p">.</span><span class="nf">readuntil</span><span class="p">(</span><span class="sa">b</span><span class="sh">"</span><span class="se">\r\n</span><span class="sh">"</span><span class="p">)</span>
    <span class="n">request</span> <span class="o">=</span> <span class="n">request_line</span><span class="p">.</span><span class="nf">decode</span><span class="p">().</span><span class="nf">rstrip</span><span class="p">()</span>
    <span class="n">method</span><span class="p">,</span> <span class="n">path</span><span class="p">,</span> <span class="n">protocol</span> <span class="o">=</span> <span class="n">request</span><span class="p">.</span><span class="nf">split</span><span class="p">(</span><span class="sh">"</span><span class="s"> </span><span class="sh">"</span><span class="p">,</span> <span class="mi">3</span><span class="p">)</span>
    <span class="n">url</span> <span class="o">=</span> <span class="nf">urlparse</span><span class="p">(</span><span class="n">path</span><span class="p">)</span>
    <span class="n">__</span><span class="p">,</span> <span class="n">http_version</span> <span class="o">=</span> <span class="n">protocol</span><span class="p">.</span><span class="nf">split</span><span class="p">(</span><span class="sh">"</span><span class="s">/</span><span class="sh">"</span><span class="p">)</span>
    <span class="n">headers</span> <span class="o">=</span> <span class="k">await</span> <span class="nf">build_scope_headers</span><span class="p">(</span><span class="n">reader</span><span class="p">)</span>

    <span class="k">return</span> <span class="p">{</span>
        <span class="sh">"</span><span class="s">type</span><span class="sh">"</span><span class="p">:</span> <span class="sh">"</span><span class="s">http</span><span class="sh">"</span><span class="p">,</span>
        <span class="sh">"</span><span class="s">asgi</span><span class="sh">"</span><span class="p">:</span> <span class="p">{</span><span class="sh">"</span><span class="s">version</span><span class="sh">"</span><span class="p">:</span> <span class="sh">"</span><span class="s">3.0</span><span class="sh">"</span><span class="p">},</span>
        <span class="sh">"</span><span class="s">http_version</span><span class="sh">"</span><span class="p">:</span> <span class="n">http_version</span><span class="p">,</span>
        <span class="sh">"</span><span class="s">method</span><span class="sh">"</span><span class="p">:</span> <span class="n">method</span><span class="p">,</span>
        <span class="sh">"</span><span class="s">scheme</span><span class="sh">"</span><span class="p">:</span> <span class="sh">"</span><span class="s">http</span><span class="sh">"</span><span class="p">,</span>
        <span class="sh">"</span><span class="s">path</span><span class="sh">"</span><span class="p">:</span> <span class="n">url</span><span class="p">.</span><span class="n">path</span><span class="p">,</span>
        <span class="sh">"</span><span class="s">query_string</span><span class="sh">"</span><span class="p">:</span> <span class="n">url</span><span class="p">.</span><span class="n">query</span><span class="p">.</span><span class="nf">encode</span><span class="p">(),</span>
        <span class="sh">"</span><span class="s">headers</span><span class="sh">"</span><span class="p">:</span> <span class="n">headers</span><span class="p">,</span>
    <span class="p">}</span>
</code></pre></div></div>

<h4 id="formating-the-http-response-headers">Formating the HTTP response headers</h4>

<p>This function will receive the response status code and headers and format an HTTP response message to be sent back.</p>

<div class="language-python highlighter-rouge"><div class="highlight"><pre class="highlight"><code><span class="k">def</span> <span class="nf">build_http_headers</span><span class="p">(</span><span class="n">scope</span><span class="p">,</span> <span class="n">event</span><span class="p">):</span>
    <span class="n">http_version</span> <span class="o">=</span> <span class="n">scope</span><span class="p">[</span><span class="sh">"</span><span class="s">http_version</span><span class="sh">"</span><span class="p">]</span>
    <span class="n">status</span> <span class="o">=</span> <span class="nc">HTTPStatus</span><span class="p">(</span><span class="n">event</span><span class="p">[</span><span class="sh">"</span><span class="s">status</span><span class="sh">"</span><span class="p">])</span>
    <span class="n">status_line</span> <span class="o">=</span> <span class="sa">f</span><span class="sh">"</span><span class="s">HTTP/</span><span class="si">{</span><span class="n">http_version</span><span class="si">}</span><span class="s"> </span><span class="si">{</span><span class="n">status</span><span class="p">.</span><span class="n">value</span><span class="si">}</span><span class="s"> </span><span class="si">{</span><span class="n">status</span><span class="p">.</span><span class="n">phrase</span><span class="si">}</span><span class="se">\r\n</span><span class="sh">"</span>

    <span class="n">headers</span> <span class="o">=</span> <span class="p">[</span><span class="n">status_line</span><span class="p">.</span><span class="nf">encode</span><span class="p">()]</span>
    <span class="k">for</span> <span class="n">header_line</span> <span class="ow">in</span> <span class="n">event</span><span class="p">.</span><span class="nf">get</span><span class="p">(</span><span class="sh">"</span><span class="s">headers</span><span class="sh">"</span><span class="p">,</span> <span class="p">[]):</span>
        <span class="n">headers</span><span class="p">.</span><span class="nf">append</span><span class="p">(</span><span class="sa">b</span><span class="sh">"</span><span class="s">: </span><span class="sh">"</span><span class="p">.</span><span class="nf">join</span><span class="p">(</span><span class="n">header_line</span><span class="p">))</span>
        <span class="n">headers</span><span class="p">.</span><span class="nf">append</span><span class="p">(</span><span class="sa">b</span><span class="sh">"</span><span class="se">\r\n</span><span class="sh">"</span><span class="p">)</span>
    <span class="n">headers</span><span class="p">.</span><span class="nf">append</span><span class="p">(</span><span class="sa">b</span><span class="sh">"</span><span class="se">\r\n</span><span class="sh">"</span><span class="p">)</span>

    <span class="k">return</span> <span class="n">headers</span>
</code></pre></div></div>

<h3 id="wrapping-up-and-next-steps">Wrapping-up and next steps</h3>

<p>In this post, I tried to cover the basic motivation why I think it’s a good idea to undertake a personal project and how this helps to guide your open-source codebases exploration. On the technical side, I introduced the HTTP protocol and the ASGI interface. In the end, we got a single-threaded server capable of handling concurrent HTTP connections using asynchronous programming.</p>

<p>If you liked the article, you should try running the sample app using this server to see it in action. Just drop the Python script in your project’s folder and you’re good to go (the server has no external dependencies). Any Python version &gt;= 3.7 should work. Tinker with the code and try to improve it, it won’t be hard :D</p>

<p>In the next post, I’ll go over the details of implementing the WebSocket protocol. Things will get more interesting, as we’re going to deal with persistent connections, state, and a lot more event types. That’s when Async programming starts to shine.</p>]]></content><author><name>Eduardo Vieira</name></author><category term="python" /><category term="asyncio" /><category term="asgi" /><category term="http" /><category term="websocket" /><summary type="html"><![CDATA[This is the first part of a series of posts detailing how I built a Python Web Server supporting HTTP and WebSocket protocols from scratch.]]></summary></entry><entry><title type="html">Async programming in Python: a survival guide</title><link href="https://eduardovra.github.io/async-programming-in-python-a-survival-guide/" rel="alternate" type="text/html" title="Async programming in Python: a survival guide" /><published>2021-05-17T03:00:00+00:00</published><updated>2021-05-17T03:00:00+00:00</updated><id>https://eduardovra.github.io/async-programming-in-python-a-survival-guide</id><content type="html" xml:base="https://eduardovra.github.io/async-programming-in-python-a-survival-guide/"><![CDATA[<p>If you’re a regular Python developer, you probably heard of one of the new buzzy features recently added to the language: async programming (the other one being type annotations).
These new features are becoming more and more a part of modern python idioms, and sooner or later you’re going to face a codebase using them. New frameworks, such as <a href="https://fastapi.tiangolo.com">FastAPI</a>, leverage these features to create fast and concise programs.</p>

<p>In this guide, we’ll go over some of the fundamentals and applications of this (not so) new programming technique.</p>

<h2 id="concurrency-and-paralellism">Concurrency and paralellism</h2>

<p>Before proceeding to the language-specific examples, it’s important to cover up some fundamentals. The first concept we have to know is the difference between concurrency and parallelism.
Parallel processes occur at the same time, for example when you have a multi-core machine. It’s a strategy suitable for CPU-bound processes, like mathematical simulations and machine learning, where most time is spent on heavy calculations.
On the other hand, concurrent processes are defined as tasks that finish in overlapping time. It doesn’t mean they are running in the same instant though. One example would be multitasking in a single-core machine. The concurrent model usually works well when we have IO-bound processes, that is, processes that spend a lot of time idle, waiting for some data to come in or to be sent out.</p>

<p>There are a few ways this concurrency can be achieved. One could be using threads and letting the OS do the scheduling automatically through time slicing. Another way would be to use a technique called cooperative multitasking. In cooperative multitasking, your functions should be instrumented by adding a few placeholding keywords, async and await, for instance, to mark the locations in which your program is expected to be waiting for a long time, and therefore can have its execution paused. When the function reaches that point, it gives control back to the scheduler and so allows it to leverage this CPU spare time to run other functions. Methods and functions that behave this way are called coroutines.</p>

<p>The entity responsible for running the coroutines is called the Event Loop. It acts as a scheduler, determining which coroutines should be resumed next. The event loop continuously monitors the underlying OS for events that might happen, such as IO or scheduled time events, generated by a sleep call. This is implemented by having a loop constantly making a system call, like <a href="https://docs.python.org/3/library/select.html">select</a>, to monitor the file descriptions used by the coroutines. The <a href="https://docs.python.org/3/library/select.html">select</a> call informs the loop about which descriptors are ready to be written to/read from, and by association, which coroutines are ready to be resumed.</p>

<p>Enough theoretical stuff, let’s get into Python.</p>

<h2 id="the-asyncio-module">The asyncio module</h2>

<p>At the time of writing, Python has a few implementations of Event Loops, but let’s stick with the built-in library called <a href="https://docs.python.org/3/library/asyncio.html">asyncio</a> for the sake of the examples. It provides a set of tools to run and manage coroutines.</p>

<p>Consider the snippet below:</p>

<div class="language-python highlighter-rouge"><div class="highlight"><pre class="highlight"><code><span class="kn">import</span> <span class="n">asyncio</span>

<span class="k">async</span> <span class="k">def</span> <span class="nf">sleep</span><span class="p">(</span><span class="n">name</span><span class="p">):</span>
    <span class="nf">print</span><span class="p">(</span><span class="sa">f</span><span class="sh">"</span><span class="s">  </span><span class="si">{</span><span class="n">name</span><span class="si">}</span><span class="s">: Starting sleep</span><span class="sh">"</span><span class="p">)</span>
    <span class="k">await</span> <span class="n">asyncio</span><span class="p">.</span><span class="nf">sleep</span><span class="p">(</span><span class="mi">1</span><span class="p">)</span>
    <span class="nf">print</span><span class="p">(</span><span class="sa">f</span><span class="sh">"</span><span class="s">  </span><span class="si">{</span><span class="n">name</span><span class="si">}</span><span class="s">: Ending sleep</span><span class="sh">"</span><span class="p">)</span>

<span class="k">async</span> <span class="k">def</span> <span class="nf">main</span><span class="p">():</span>
    <span class="nf">print</span><span class="p">(</span><span class="sh">"</span><span class="s">Runnning coroutines sequentially:</span><span class="sh">"</span><span class="p">)</span>
    <span class="k">await</span> <span class="nf">sleep</span><span class="p">(</span><span class="sh">"</span><span class="s">A</span><span class="sh">"</span><span class="p">)</span>
    <span class="k">await</span> <span class="nf">sleep</span><span class="p">(</span><span class="sh">"</span><span class="s">B</span><span class="sh">"</span><span class="p">)</span>

    <span class="nf">print</span><span class="p">(</span><span class="sh">"</span><span class="s">Running coroutines concurrently:</span><span class="sh">"</span><span class="p">)</span>
    <span class="k">await</span> <span class="n">asyncio</span><span class="p">.</span><span class="nf">gather</span><span class="p">(</span>
        <span class="nf">sleep</span><span class="p">(</span><span class="sh">"</span><span class="s">C</span><span class="sh">"</span><span class="p">),</span>
        <span class="nf">sleep</span><span class="p">(</span><span class="sh">"</span><span class="s">D</span><span class="sh">"</span><span class="p">),</span>
    <span class="p">)</span>

<span class="n">asyncio</span><span class="p">.</span><span class="nf">run</span><span class="p">(</span><span class="nf">main</span><span class="p">())</span>
</code></pre></div></div>

<p>The code is pretty self-explanatory, but the two interesting things here are the use of the <code class="language-plaintext highlighter-rouge">async</code> keyword to define the coroutines, and the usage of the <code class="language-plaintext highlighter-rouge">await</code> keyword, which defines points in the code where the function can be paused/resumed. At the end of the script, we called <code class="language-plaintext highlighter-rouge">asyncio.run</code> to start the loop, handing over the main coroutine. <strong>All coroutines should be either awaited or passed to the event loop.</strong></p>

<h2 id="pro-tip">Pro tip</h2>

<p>Rule number one of async programming is: <strong>never block the event loop!</strong> To do so, it’s essential that within the coroutines, from the calling function down to the operating system, there shouldn’t be any blocking calls, such as sleep, synchronously read/write from files/sending network requests, etc. This means that even though you’re not obliged to convert all your codebase to use async at once, the parts that you do should only be using libraries prepared to be run from event loops.</p>

<p>The good news is that most packages implementing async provide a compatible interface with their synchronous counterparts:</p>

<ul>
  <li><a href="https://docs.python-requests.org">requests</a>: <a href="https://www.python-httpx.org">httpx</a>, <a href="https://docs.aiohttp.org">aiohttp</a></li>
  <li><a href="https://flask.palletsprojects.com">Flask</a>: <a href="https://fastapi.tiangolo.com">FastAPI</a>, <a href="https://pgjones.gitlab.io/quart">Quart</a></li>
  <li><a href="https://www.psycopg.org">psycopg2</a>: <a href="https://github.com/MagicStack/asyncpg">asyncpg</a></li>
</ul>

<h2 id="asgi-a-new-standard-supporting-websockets">ASGI: a new standard supporting WebSockets</h2>

<p>One of the great applications of async in web development is implementing <a href="https://en.wikipedia.org/wiki/WebSocket">WebSocket</a> servers. As opposed to regular HTTP request/response cycles, which are synchronous and stateless, when using WebSockets, the server and the client must keep a stateful connection active that can last for hours, exchanging messages once in a while, so the server needs to be able to keep lots of processes running on his end.</p>

<p>Having a server running hundreds or thousands of threads and processes doesn’t scale well, but, with cooperative multitasking, we have a feasible alternative. Assuming that most of the time, the tasks are going to be idle, waiting for some data or user interaction, event loops seemed a really good fit to keep the multitasking overhead at bay.</p>

<p>The problem is: the whole application stack must be rewritten to achieve this. Web frameworks like <a href="https://www.djangoproject.com">Django</a> were not prepared to be used this way. And even the <a href="https://en.wikipedia.org/wiki/Web_Server_Gateway_Interface">WSGI</a> protocol, used to exchange data between the server and the web apps, had to the rethought.</p>

<p>That’s when the <a href="https://asgi.readthedocs.io">ASGI</a> standard came about, a new protocol for integration of frameworks and the webservers supporting async. With the advent of this new interface, many new tools were created or improved to support the emerging standard, including frameworks like Django (using <a href="https://channels.readthedocs.io">Channels</a>), as well as webservers like <a href="https://github.com/django/daphne">Daphne</a> and <a href="https://www.uvicorn.org">Uvicorn</a>. The ASGI interface also added the capability for the servers to implement Server Pushes over both WebSockets and <a href="https://en.wikipedia.org/wiki/HTTP/2_Server_Push">HTTP/2</a>, enabling the backend to send data to the browser without being requested. This enables the creating of new software architectures that were almost impossible before.</p>

<h2 id="spawning-tasks">Spawning tasks</h2>

<p>Until now, we have covered the following ways of running the coroutines:</p>

<ul>
  <li>Passing it to the event loop using <code class="language-plaintext highlighter-rouge">asyncio.run</code></li>
  <li>Awaiting on them</li>
  <li>Running multiple coroutines concurrently by using <code class="language-plaintext highlighter-rouge">asyncio.gather</code></li>
</ul>

<p>But, what if we wanted to spawn a task dynamically ? For instance, suppose we have a main loop handling events coming from the standard input, and in certain cases, we should spawn a long-running process in parallel to avoid blocking the loop.</p>

<p>The following example depicts this scenario. A third-party library called <a href="https://github.com/Tinche/aiofiles">aiofiles</a> is used, because the native <em>read</em> system call would block the loop.</p>

<div class="language-python highlighter-rouge"><div class="highlight"><pre class="highlight"><code><span class="kn">import</span> <span class="n">asyncio</span>
<span class="kn">import</span> <span class="n">aiofiles</span>

<span class="k">async</span> <span class="k">def</span> <span class="nf">delayed_echo</span><span class="p">(</span><span class="n">text</span><span class="p">):</span>
    <span class="k">await</span> <span class="n">asyncio</span><span class="p">.</span><span class="nf">sleep</span><span class="p">(</span><span class="mi">1</span><span class="p">)</span>
    <span class="nf">print</span><span class="p">(</span><span class="sa">f</span><span class="sh">"</span><span class="s">  Your text back, after 1 sec: </span><span class="si">{</span><span class="n">text</span><span class="si">}</span><span class="sh">"</span><span class="p">)</span>

<span class="k">async</span> <span class="k">def</span> <span class="nf">main</span><span class="p">():</span>
    <span class="k">async</span> <span class="k">with</span> <span class="n">aiofiles</span><span class="p">.</span><span class="nf">open</span><span class="p">(</span><span class="sh">"</span><span class="s">/dev/stdin</span><span class="sh">"</span><span class="p">,</span> <span class="sh">"</span><span class="s">r</span><span class="sh">"</span><span class="p">)</span> <span class="k">as</span> <span class="n">f</span><span class="p">:</span>
        <span class="k">while</span> <span class="bp">True</span><span class="p">:</span>
            <span class="n">text</span> <span class="o">=</span> <span class="k">await</span> <span class="n">f</span><span class="p">.</span><span class="nf">readline</span><span class="p">()</span>
            <span class="n">task</span> <span class="o">=</span> <span class="n">asyncio</span><span class="p">.</span><span class="nf">create_task</span><span class="p">(</span><span class="nf">delayed_echo</span><span class="p">(</span><span class="n">text</span><span class="p">))</span>

<span class="n">asyncio</span><span class="p">.</span><span class="nf">run</span><span class="p">(</span><span class="nf">main</span><span class="p">())</span>
</code></pre></div></div>

<p>As you can see, the <code class="language-plaintext highlighter-rouge">asyncio.create_task</code> function is provided to allow running on-demand tasks concurrently. It’s the <em>async</em> equivalent of creating <em>threads</em>. The function returns a task handle as well, although it’s being ignored in our case. The handle allows the application to <em>cancel</em> or to <em>join</em> the task waiting for its conclusion.</p>

<h2 id="conclusion">Conclusion</h2>

<p>This article gives a glimpse of the fundamentals and will help you start to get acquainted with async programming. This is a really strong buzzword right now, not only in the python world but in web software development in general. There’s a whole ecosystem of apps and tools being developed to leverage this new approach. I think it’s really something worth going deeper if you want to juice up your skills as a developer capable of writing modern Python code.</p>

<p>The emerging of WebSocket-enabled servers also impacts front-end development. Maybe it could mean a shift in what it’s known as best practice for web software design nowadays. This is noticeable by the bubbling up of new tools as <a href="https://hotwire.dev">Hotwire</a>, <a href="https://laravel-livewire.com">Livewire</a>, and <a href="https://hexdocs.pm/phoenix_live_view/Phoenix.LiveView.html">Liveview</a>.</p>

<p>My suggestion is to go beyond this post and read other authors as well, there’s a lot of material out <a href="https://github.com/florimondmanca/awesome-asgi#publications">there</a>. When you feel comfortable, try to build something meaningful as you go over the asyncio documentation exploring more code examples.</p>]]></content><author><name>Eduardo Vieira</name></author><category term="python" /><category term="asyncio" /><category term="asgi" /><summary type="html"><![CDATA[All you need to know to get started in async programming using modern Python 3]]></summary></entry><entry><title type="html">Building two sample apps using Hotwire and Flask</title><link href="https://eduardovra.github.io/building-two-sample-apps-using-hotwire-and-flask/" rel="alternate" type="text/html" title="Building two sample apps using Hotwire and Flask" /><published>2021-04-27T03:00:00+00:00</published><updated>2021-04-27T03:00:00+00:00</updated><id>https://eduardovra.github.io/building-two-sample-apps-using-hotwire-and-flask</id><content type="html" xml:base="https://eduardovra.github.io/building-two-sample-apps-using-hotwire-and-flask/"><![CDATA[<p>After covering up the basics on both <a href="/a-first-look-at-hotwire/">Turbo</a> and <a href="/hotwire-and-stimulus-for-javascript-sprinkles/">Stimulus</a>, we’re good to start building something. I’ve used Python’s <a href="https://flask.palletsprojects.com/">Flask</a> micro-framework on the server.</p>

<p>The first application is an image loader, where we’re gonna see Turbo Drive, Frames, and Streams all in action. No javascript was used in this example.
On the second app, we build an interactive tool for you to write a recipe, featuring a search field with autocompletion. In this example, we use a Stimulus controller, Turbo Drive and, Turbo Frames to incrementally update the UI.</p>

<p>Bear in mind that the approach I’ve used is not necessarily the “best”, as my focus was in demonstrating a couple of use cases in the simplest way I could. These examples were conceived to be used for educational purposes only.</p>

<p>All the code is available in this <a href="https://github.com/eduardovra/hotwire-flask-demo">GitHub repository</a>.</p>

<h2 id="project-setup">Project setup</h2>

<p>The project uses python 3.8 and a <em>Pipenv</em> file is provided to ease the installation of dependencies. Just clone the repo, perform a <code>pipenv install</code> and you’re all set.</p>

<p>Each example is located within its subfolder and is a completely separate Flask application. To run the server, activate the pipenv environment, <code>cd</code> to the folder and, execute the <code>flask run</code> command.</p>

<h2 id="image-loader-with-no-javascript">Image loader with no Javascript</h2>

<p>For the first example, I wanted to explore a simple case where Javascript is usually used for: dynamically pulling data from the server and appending it to the DOM. This application is composed of a button and a list of images. When the button is pressed, it triggers the process of loading a new image and adding it to the UI. The number of images is displayed on the top of the screen and it’s also kept within the server between page reloads.</p>

<p><img src="/assets/img/hotwire-image-loader.gif" alt="A gif showing the image loader application working" /></p>

<p>The page is composed of the main HTML template and one partial as you’ll see below. Styles were omitted for clarity.</p>

<div class="language-html highlighter-rouge"><div class="highlight"><pre class="highlight"><code><span class="c">&lt;!-- index.html --&gt;</span>
<span class="nt">&lt;h2&gt;</span>
  Images loaded: <span class="nt">&lt;turbo-frame</span> <span class="na">id=</span><span class="s">"counter"</span><span class="nt">&gt;</span>{{ counter }}<span class="nt">&lt;/turbo-frame&gt;</span>
<span class="nt">&lt;/h2&gt;</span>

<span class="nt">&lt;turbo-frame</span> <span class="na">id=</span><span class="s">"images"</span><span class="nt">&gt;</span>
  {% for seq in range(0, counter) %}
    {% include '_image.html' %}
  {% endfor %}
<span class="nt">&lt;/turbo-frame&gt;</span>

<span class="nt">&lt;turbo-frame</span> <span class="na">id=</span><span class="s">"button"</span><span class="nt">&gt;</span>
  <span class="nt">&lt;form</span> <span class="na">action=</span><span class="s">"/add-image"</span> <span class="na">method=</span><span class="s">"post"</span><span class="nt">&gt;</span>
    <span class="nt">&lt;input</span> <span class="na">type=</span><span class="s">"submit"</span> <span class="na">value=</span><span class="s">"Load more"</span><span class="nt">&gt;</span>
  <span class="nt">&lt;/form&gt;</span>
<span class="nt">&lt;/turbo-frame&gt;</span>

<span class="c">&lt;!-- _image.html --&gt;</span>
<span class="nt">&lt;turbo-frame</span> <span class="na">id=</span><span class="s">"{{ seq }}"</span><span class="nt">&gt;</span>
  <span class="nt">&lt;img</span> <span class="na">src=</span><span class="s">"https://picsum.photos/536/354?{{ seq }}"</span> <span class="nt">/&gt;</span>
<span class="nt">&lt;/turbo-frame&gt;</span>
</code></pre></div></div>

<p>The <em>index.html</em> file contains 3 Turbo Frames:</p>

<ul>
  <li>One containing the loaded images count. The use of the frame here will allow us to update this value dynamically from the server afterward, using Turbo Streams.</li>
  <li>A frame for the placement of the images. It’s used both to render the initial page load, but also for rendering HTML on subsequent Ajax calls.
    <ul>
      <li>Notice that the images are random, and will always change whenever the page is reloaded.</li>
    </ul>
  </li>
  <li>And a frame for the form, which enables Turbo Drive on submission.</li>
</ul>

<p>Now the python code for the server part.</p>

<div class="language-python highlighter-rouge"><div class="highlight"><pre class="highlight"><code><span class="n">sequence</span> <span class="o">=</span> <span class="mi">0</span>

<span class="nd">@app.route</span><span class="p">(</span><span class="sh">"</span><span class="s">/</span><span class="sh">"</span><span class="p">,</span> <span class="n">methods</span><span class="o">=</span><span class="p">[</span><span class="sh">"</span><span class="s">GET</span><span class="sh">"</span><span class="p">,])</span>
<span class="k">def</span> <span class="nf">index</span><span class="p">():</span>
    <span class="k">return</span> <span class="nf">render_template</span><span class="p">(</span><span class="sh">"</span><span class="s">index.html</span><span class="sh">"</span><span class="p">,</span> <span class="n">counter</span><span class="o">=</span><span class="n">sequence</span><span class="p">)</span>

<span class="nd">@app.route</span><span class="p">(</span><span class="sh">"</span><span class="s">/add-image</span><span class="sh">"</span><span class="p">,</span> <span class="n">methods</span><span class="o">=</span><span class="p">[</span><span class="sh">"</span><span class="s">POST</span><span class="sh">"</span><span class="p">,])</span>
<span class="k">def</span> <span class="nf">add_image</span><span class="p">():</span>
    <span class="n">sequence</span> <span class="o">+=</span> <span class="mi">1</span>
    <span class="n">html</span> <span class="o">=</span> <span class="nf">render_template</span><span class="p">(</span><span class="sh">"</span><span class="s">_image.html</span><span class="sh">"</span><span class="p">,</span> <span class="n">seq</span><span class="o">=</span><span class="n">sequence</span><span class="p">)</span>

    <span class="k">return</span> <span class="n">turbo</span><span class="p">.</span><span class="nf">stream</span><span class="p">([</span>
        <span class="n">turbo</span><span class="p">.</span><span class="nf">append</span><span class="p">(</span><span class="n">html</span><span class="p">,</span> <span class="n">target</span><span class="o">=</span><span class="sh">"</span><span class="s">images</span><span class="sh">"</span><span class="p">),</span>
        <span class="n">turbo</span><span class="p">.</span><span class="nf">update</span><span class="p">(</span><span class="n">sequence</span><span class="p">,</span> <span class="n">target</span><span class="o">=</span><span class="sh">"</span><span class="s">counter</span><span class="sh">"</span><span class="p">),</span>
    <span class="p">])</span>
</code></pre></div></div>

<p>This code is pretty straightforward, with the root path providing the initial page load, and one additional method for adding new images. When the user clicks on the <em>Load more</em> button, an Ajax request is performed to the <em>/add-image</em> method. This method responds with a stream of two actions: one for appending the new image within its own frame, and another one to update the incremented value of images loaded.</p>

<h2 id="recipe-creator-with-auto-completion">Recipe creator with auto-completion</h2>

<p>In this example, we’ll be building an interactive recipe creator, where the user is allowed to select from a previously defined set of ingredients and add them to a list as they please. The ingredient selector is composed of an input field equipped with auto-completion for a better user experience.</p>

<p>The search input field fetches ingredients from the server on the fly as you type. These ingredients are shown below the field, and when the user clicks on one of them, the ingredient is added to the recipe on the right. If you click on the same ingredient more than once, the amount is added up to the list on the recipe.
The panel on the right shows the list of currently selected ingredients and has a small button allowing the user to remove each of them.</p>

<p><img src="/assets/img/hotwire-autocomplete.gif" alt="A gif showing the autocomplete application working" /></p>

<p>The HTML section of the code:</p>

<div class="language-html highlighter-rouge"><div class="highlight"><pre class="highlight"><code><span class="c">&lt;!-- index.html --&gt;</span>
<span class="nt">&lt;div</span> <span class="na">class=</span><span class="s">"flex-container"</span><span class="nt">&gt;</span>
  <span class="nt">&lt;div</span> <span class="na">class=</span><span class="s">"flex-item"</span><span class="nt">&gt;</span>
    <span class="nt">&lt;h2&gt;</span>Add ingredient<span class="nt">&lt;/h2&gt;</span>

    <span class="nt">&lt;div</span> <span class="na">data-controller=</span><span class="s">"search"</span>
        <span class="na">data-search-url-value=</span><span class="s">"{{ url_for('search') }}?q=%s"</span><span class="nt">&gt;</span>
      <span class="nt">&lt;div&gt;</span>
        <span class="nt">&lt;input</span> <span class="na">type=</span><span class="s">"search"</span> <span class="na">data-action=</span><span class="s">"search#findResults"</span> <span class="nt">/&gt;</span>
      <span class="nt">&lt;/div&gt;</span>
      <span class="nt">&lt;div&gt;</span>
        <span class="nt">&lt;turbo-frame</span> <span class="na">id=</span><span class="s">"search-results"</span> <span class="na">data-search-target=</span><span class="s">"results"</span><span class="nt">&gt;</span>
        <span class="nt">&lt;/turbo-frame&gt;</span>
      <span class="nt">&lt;/div&gt;</span>
    <span class="nt">&lt;/div&gt;</span>
  <span class="nt">&lt;/div&gt;</span>

  <span class="nt">&lt;div</span> <span class="na">class=</span><span class="s">"flex-item"</span><span class="nt">&gt;</span>
    <span class="nt">&lt;h2&gt;</span>Recipe<span class="nt">&lt;/h2&gt;</span>
    <span class="nt">&lt;ul&gt;</span>
      {% include '_recipe.html' %}
    <span class="nt">&lt;/ul&gt;</span>
  <span class="nt">&lt;/div&gt;</span>
<span class="nt">&lt;/div&gt;</span>
</code></pre></div></div>

<p>The interesting part here is the use of a Stimulus controller to allow the fetching of auto-completion suggestions as to the user types in an ingredient’s name. The 
data attribute <code class="language-plaintext highlighter-rouge">data-controller="search"</code> on the outer div makes the binding to the controller’s Javascript object.</p>

<p>On the input field, a callback method is set to be called when the user types something using the attribute <code class="language-plaintext highlighter-rouge">data-action="search#findResults"</code>. Finally, a Turbo Frame was placed to hold the search results and a <em>target</em> data attribute was set allowing access to it from the controller.</p>

<p>Now for the HTML partials:</p>

<div class="language-html highlighter-rouge"><div class="highlight"><pre class="highlight"><code><span class="c">&lt;!-- _search.html --&gt;</span>
<span class="nt">&lt;turbo-frame</span> <span class="na">id=</span><span class="s">"search-results"</span><span class="nt">&gt;</span>
  {% for ingredient in ingredients %}
    <span class="nt">&lt;div&gt;</span>
      <span class="nt">&lt;a</span> <span class="na">href=</span><span class="s">"{{ url_for('add', ingredient=ingredient.name) }}"</span>
          <span class="na">data-turbo-frame=</span><span class="s">"recipe"</span><span class="nt">&gt;</span>
        <span class="nt">&lt;strong&gt;</span>{{ ingredient.strong }}<span class="nt">&lt;/strong&gt;</span>{{ ingredient.non_strong }}
      <span class="nt">&lt;/a&gt;</span>
    <span class="nt">&lt;/div&gt;</span>
  {% endfor %}
<span class="nt">&lt;/turbo-frame&gt;</span>

<span class="c">&lt;!-- _recipe.html --&gt;</span>
<span class="nt">&lt;turbo-frame</span> <span class="na">id=</span><span class="s">"recipe"</span><span class="nt">&gt;</span>
  {% for ingredient, amount in recipe.items() %}
    <span class="nt">&lt;li&gt;</span>
      {{ ingredient }} <span class="nt">&lt;span&gt;</span>{{ amount }}<span class="nt">&lt;/span&gt;</span>
      <span class="nt">&lt;span&gt;</span>
        <span class="nt">&lt;a</span> <span class="na">href=</span><span class="s">"{{ url_for('exclude', ingredient=ingredient) }}"</span><span class="nt">&gt;</span>
          <span class="nt">&lt;button</span> <span class="na">type=</span><span class="s">"button"</span> <span class="na">aria-label=</span><span class="s">"Close"</span><span class="nt">&gt;</span>
            <span class="nt">&lt;span</span> <span class="na">aria-hidden=</span><span class="s">"true"</span><span class="nt">&gt;</span><span class="ni">&amp;times;</span><span class="nt">&lt;/span&gt;</span>
          <span class="nt">&lt;/button&gt;</span>
        <span class="nt">&lt;/a&gt;</span>
      <span class="nt">&lt;/span&gt;</span>
    <span class="nt">&lt;/li&gt;</span>
  {% endfor %}
<span class="nt">&lt;/turbo-frame&gt;</span>
</code></pre></div></div>

<p>As we can see, the <em>search-results</em> frame is used to render the auto-completion suggestions. Each item is an anchor targeting a method for exclusion of ingredients on the server. When the user clicks on an ingredient, we want the recipe to be updated, instead of the current frame. To achieve this, we set a data attribute <code class="language-plaintext highlighter-rouge">data-turbo-frame="recipe"</code> to indicate that the Ajax response from this call should be rendered within the context of another frame, called <code class="language-plaintext highlighter-rouge">recipe</code>.</p>

<p>On the <em>recipe</em> frame, there’s a list of currently selected ingredients, also showing the quantities for each of them. A link for exclusion is set to call the respective method on the server.</p>

<p>Let’s proceed and see how the Stimulus controller was put together. Note that I used a slightly different syntax for the controller class, because it was written directly in the body of the HTML.</p>

<div class="language-javascript highlighter-rouge"><div class="highlight"><pre class="highlight"><code><span class="nx">application</span><span class="p">.</span><span class="nf">register</span><span class="p">(</span><span class="dl">"</span><span class="s2">search</span><span class="dl">"</span><span class="p">,</span> <span class="kd">class</span> <span class="nc">extends</span> <span class="nx">Stimulus</span><span class="p">.</span><span class="nx">Controller</span> <span class="p">{</span>
  <span class="kd">static</span> <span class="kd">get</span> <span class="nf">targets</span><span class="p">()</span> <span class="p">{</span>
    <span class="k">return</span> <span class="p">[</span> <span class="dl">"</span><span class="s2">results</span><span class="dl">"</span> <span class="p">]</span>
  <span class="p">}</span>

  <span class="kd">static</span> <span class="kd">get</span> <span class="nf">values</span><span class="p">()</span> <span class="p">{</span>
    <span class="k">return</span> <span class="p">{</span> <span class="na">url</span><span class="p">:</span> <span class="nb">String</span> <span class="p">}</span>
  <span class="p">}</span>

  <span class="nf">findResults</span><span class="p">(</span><span class="nx">event</span><span class="p">)</span> <span class="p">{</span>
    <span class="kd">const</span> <span class="nx">q</span> <span class="o">=</span> <span class="nf">encodeURIComponent</span><span class="p">(</span><span class="nx">event</span><span class="p">.</span><span class="nx">target</span><span class="p">.</span><span class="nx">value</span><span class="p">)</span>
    <span class="kd">const</span> <span class="nx">url</span> <span class="o">=</span> <span class="k">this</span><span class="p">.</span><span class="nx">urlValue</span><span class="p">.</span><span class="nf">replace</span><span class="p">(</span><span class="sr">/%s/g</span><span class="p">,</span> <span class="nx">q</span><span class="p">)</span>
    <span class="k">this</span><span class="p">.</span><span class="nx">resultsTarget</span><span class="p">.</span><span class="nx">src</span> <span class="o">=</span> <span class="k">this</span><span class="p">.</span><span class="nx">urlValue</span><span class="p">.</span><span class="nf">replace</span><span class="p">(</span><span class="sr">/%s/g</span><span class="p">,</span> <span class="nx">q</span><span class="p">)</span>
  <span class="p">}</span>
<span class="p">})</span>
</code></pre></div></div>

<p>This may seem confusing at first, but let’s break it down. At the top of the class, the <em>targets</em> and <em>values</em> statements define the elements and attributes that we’re interested in. The <code class="language-plaintext highlighter-rouge">results</code> element being the Turbo Frame used for displaying the search results, and the <code class="language-plaintext highlighter-rouge">url</code> value being a template string holding the URL along with the query string that the server expects.</p>

<p>When the user types a new character, the <code class="language-plaintext highlighter-rouge">findResults()</code> method is triggered. It uses the <em>url</em> value provided from the server along with the input string provided by the user in the field, to build a new <em>src</em> attribute for the Turbo Frame. Turbo will detect this change on the element and trigger an Ajax call to the server. Now the server responds with a HTML segment matching the Turbo Frame’s ID and bingo, we have a list of ingredient suggestions on the screen.</p>

<p>In the server-side code, just simple methods for rendering the HTML templates, and a search method that filters on the list of ingredients available.</p>

<div class="language-python highlighter-rouge"><div class="highlight"><pre class="highlight"><code><span class="n">recipe</span> <span class="o">=</span> <span class="nf">defaultdict</span><span class="p">(</span><span class="nb">int</span><span class="p">)</span>

<span class="nd">@app.route</span><span class="p">(</span><span class="sh">"</span><span class="s">/</span><span class="sh">"</span><span class="p">)</span>
<span class="k">def</span> <span class="nf">index</span><span class="p">():</span>
    <span class="k">return</span> <span class="nf">render_template</span><span class="p">(</span><span class="sh">"</span><span class="s">index.html</span><span class="sh">"</span><span class="p">,</span> <span class="n">recipe</span><span class="o">=</span><span class="n">recipe</span><span class="p">)</span>

<span class="nd">@app.route</span><span class="p">(</span><span class="sh">"</span><span class="s">/add/&lt;ingredient&gt;</span><span class="sh">"</span><span class="p">)</span>
<span class="k">def</span> <span class="nf">add</span><span class="p">(</span><span class="n">ingredient</span><span class="p">):</span>
    <span class="n">recipe</span><span class="p">[</span><span class="n">ingredient</span><span class="p">]</span> <span class="o">+=</span> <span class="mi">1</span>
    <span class="k">return</span> <span class="nf">render_template</span><span class="p">(</span><span class="sh">'</span><span class="s">_recipe.html</span><span class="sh">'</span><span class="p">,</span> <span class="n">recipe</span><span class="o">=</span><span class="n">recipe</span><span class="p">)</span>

<span class="nd">@app.route</span><span class="p">(</span><span class="sh">"</span><span class="s">/exclude/&lt;ingredient&gt;</span><span class="sh">"</span><span class="p">)</span>
<span class="k">def</span> <span class="nf">exclude</span><span class="p">(</span><span class="n">ingredient</span><span class="p">):</span>
    <span class="k">del</span> <span class="n">recipe</span><span class="p">[</span><span class="n">ingredient</span><span class="p">]</span>
    <span class="k">return</span> <span class="nf">render_template</span><span class="p">(</span><span class="sh">'</span><span class="s">_recipe.html</span><span class="sh">'</span><span class="p">,</span> <span class="n">recipe</span><span class="o">=</span><span class="n">recipe</span><span class="p">)</span>

<span class="nd">@app.route</span><span class="p">(</span><span class="sh">"</span><span class="s">/search</span><span class="sh">"</span><span class="p">)</span>
<span class="k">def</span> <span class="nf">search</span><span class="p">():</span>
    <span class="n">q</span> <span class="o">=</span> <span class="n">request</span><span class="p">.</span><span class="n">args</span><span class="p">.</span><span class="nf">get</span><span class="p">(</span><span class="sh">"</span><span class="s">q</span><span class="sh">"</span><span class="p">)</span>

    <span class="n">ingredients</span> <span class="o">=</span> <span class="p">[</span>
        <span class="p">{</span>
            <span class="sh">"</span><span class="s">name</span><span class="sh">"</span><span class="p">:</span> <span class="n">ingredient</span><span class="p">,</span>
            <span class="sh">"</span><span class="s">strong</span><span class="sh">"</span><span class="p">:</span> <span class="n">ingredient</span><span class="p">[:</span><span class="nf">len</span><span class="p">(</span><span class="n">q</span><span class="p">)],</span> <span class="c1"># Make typed chars bold
</span>            <span class="sh">"</span><span class="s">non_strong</span><span class="sh">"</span><span class="p">:</span> <span class="n">ingredient</span><span class="p">[</span><span class="nf">len</span><span class="p">(</span><span class="n">q</span><span class="p">):],</span> <span class="c1"># The rest of the string
</span>        <span class="p">}</span>
        <span class="k">for</span> <span class="n">ingredient</span> <span class="ow">in</span> <span class="n">INGREDIENTS</span>
        <span class="k">if</span> <span class="n">q</span> <span class="ow">and</span> <span class="n">ingredient</span><span class="p">.</span><span class="nf">lower</span><span class="p">().</span><span class="nf">startswith</span><span class="p">(</span><span class="n">q</span><span class="p">.</span><span class="nf">lower</span><span class="p">())</span>
    <span class="p">]</span>

    <span class="k">return</span> <span class="nf">render_template</span><span class="p">(</span><span class="sh">'</span><span class="s">_search.html</span><span class="sh">'</span><span class="p">,</span> <span class="n">ingredients</span><span class="o">=</span><span class="n">ingredients</span><span class="p">)</span>
</code></pre></div></div>

<h2 id="wrapping-up">Wrapping up</h2>

<p>As we go through these examples, we can see how the design can be HTML-centric when using Hotwire. Of course, both examples were very simplistic cases of applications, but it’s noticeable that a lot can be achieved by using just plain HTML and a few sprinkles of Javascript.</p>

<p>Building these apps helped me a lot to sink in the concepts. I hope reading about it was worth it for you too. Project-based learning is a quite effective way of internalizing concepts, and writing about what we’ve learned helps even more.</p>

<p>Last but not least, I just wanted to mention that both application ideas were inspired by discussions I’ve read on <a href="https://discuss.hotwire.dev/">Hotwire’s official forum</a>. It’s a really nice place to discuss ideas regarding how to use this project.</p>]]></content><author><name>Eduardo Vieira</name></author><category term="Hotwire" /><category term="Javascript" /><category term="Python" /><category term="Flask" /><summary type="html"><![CDATA[A walk through on building two sample applications using Hotwire and Flask]]></summary></entry><entry><title type="html">Hotwire and Stimulus for Javascript sprinkles</title><link href="https://eduardovra.github.io/hotwire-and-stimulus-for-javascript-sprinkles/" rel="alternate" type="text/html" title="Hotwire and Stimulus for Javascript sprinkles" /><published>2021-04-20T03:00:00+00:00</published><updated>2021-04-20T03:00:00+00:00</updated><id>https://eduardovra.github.io/hotwire-and-stimulus-for-javascript-sprinkles</id><content type="html" xml:base="https://eduardovra.github.io/hotwire-and-stimulus-for-javascript-sprinkles/"><![CDATA[<p>Following up my on <a href="/a-first-look-at-hotwire/">previous</a> Hotwire article, now we’re going to take a look at Stimulus: the component responsible for adding behavior to your pages without bloating them with Javascript.</p>

<h3 id="stimulus-controllers">Stimulus controllers</h3>

<p>Stimulus is a Javascript framework, intended to be used as a tool to add the little sprinkles every web app needs.</p>

<p>The building blocks of a Stimulus application are the <em>controllers</em>. Controllers are Javascript objects that are connected to HTML elements using tag annotations. Stimulus constantly monitors new elements on the page looking for a specific attribute to match for a corresponding controller. When it finds one, an instance of the controller is created and then connected to the element on the DOM.</p>

<p>As you’ll see, Stimulus follows the <em>Convention over Configuration</em> practice. This alone can help to reduce the amount of boilerplate code one needs to write. Most naming conventions will be self-explanatory, once we go through the examples.</p>

<p>Controllers allow us to:</p>

<ul>
  <li>Respond to user interaction with action callbacks</li>
  <li>Read, write and monitor elements</li>
  <li>Access data attributes on elements to store values, keeping state in the DOM</li>
</ul>

<p>Other highlights:</p>

<ul>
  <li>Controllers are small, re-usable javascript components</li>
  <li>They are not supposed to be used for templates rendering: it’s preferable to keep this task to the backend. So every time a new chunk of HTML is needed, it should be fetched from the server</li>
  <li>Whenever possible, the state is kept within the DOM, and not on Javascript objects</li>
  <li>The binding between controllers and the HTML elements are set using declarative tags</li>
  <li>Lifecycle hooks are provided to allow initialization of each controller instance</li>
</ul>

<h3 id="show-me-the-code">Show me the code</h3>

<p>I’m a big fan of learning by examples, so let’s jump right into the code. Consider the following HTML snippet, taken from the official guidebook:</p>

<div class="language-html highlighter-rouge"><div class="highlight"><pre class="highlight"><code><span class="nt">&lt;div</span> <span class="na">data-controller=</span><span class="s">"hello"</span><span class="nt">&gt;</span>
  <span class="nt">&lt;input</span> <span class="na">data-hello-target=</span><span class="s">"name"</span> <span class="na">type=</span><span class="s">"text"</span><span class="nt">&gt;</span>
  <span class="nt">&lt;button</span> <span class="na">data-action=</span><span class="s">"click-&gt;hello#greet"</span><span class="nt">&gt;</span>Greet<span class="nt">&lt;/button&gt;</span>
<span class="nt">&lt;/div&gt;</span>
</code></pre></div></div>

<p>Things to notice here:</p>

<ul>
  <li>A data attribute <code>data-controller</code> indicates Stimulus should create an instance of the default class in <em>hello_controller.js</em> and bind it to the <code>&lt;div&gt;</code> element</li>
  <li>The <code>data-hello-target</code> attribute tells that this element should be bound to the controller’s scope so that we can access his value later</li>
  <li>The <code>data-action</code> attribute assigns the <code>greet()</code> method as an action callback to be called when the <code>&lt;button&gt;</code> element gets clicked</li>
</ul>

<p>Now the corresponding Stimulus controller:</p>

<div class="language-javascript highlighter-rouge"><div class="highlight"><pre class="highlight"><code><span class="c1">// src/controllers/hello_controller.js</span>
<span class="k">import</span> <span class="p">{</span> <span class="nx">Controller</span> <span class="p">}</span> <span class="k">from</span> <span class="dl">"</span><span class="s2">stimulus</span><span class="dl">"</span>

<span class="k">export</span> <span class="k">default</span> <span class="kd">class</span> <span class="nc">extends</span> <span class="nx">Controller</span> <span class="p">{</span>
  <span class="kd">static</span> <span class="nx">targets</span> <span class="o">=</span> <span class="p">[</span> <span class="dl">"</span><span class="s2">name</span><span class="dl">"</span> <span class="p">]</span>

  <span class="nf">greet</span><span class="p">()</span> <span class="p">{</span>
    <span class="kd">const</span> <span class="nx">element</span> <span class="o">=</span> <span class="k">this</span><span class="p">.</span><span class="nx">nameTarget</span>
    <span class="kd">const</span> <span class="nx">name</span> <span class="o">=</span> <span class="nx">element</span><span class="p">.</span><span class="nx">value</span>
    <span class="nx">console</span><span class="p">.</span><span class="nf">log</span><span class="p">(</span><span class="s2">`Hello, </span><span class="p">${</span><span class="nx">name</span><span class="p">}</span><span class="s2">!`</span><span class="p">)</span>
  <span class="p">}</span>
<span class="p">}</span>
</code></pre></div></div>

<p>What is happening:</p>

<ul>
  <li>The <code>targets</code> property declares that Stimulus must look for elements within the controller’s scope, which have a data attribute <code>data-hello-target</code> with a value of <code>"name"</code>. This element is going to be placed in a property called <code>nameTarget</code></li>
  <li>When the button is clicked, the <code>greet()</code> method is called and value of the input field is printed to the console</li>
</ul>

<h3 id="another-example-slide-show">Another example: slide-show</h3>

<p>Consider another example extracted from the official guidebook, a slide-show application:</p>

<div class="language-html highlighter-rouge"><div class="highlight"><pre class="highlight"><code><span class="nt">&lt;div</span> <span class="na">data-controller=</span><span class="s">"slideshow"</span> <span class="na">data-slideshow-index-value=</span><span class="s">"1"</span><span class="nt">&gt;</span>
  <span class="nt">&lt;button</span> <span class="na">data-action=</span><span class="s">"slideshow#previous"</span><span class="nt">&gt;</span> ← <span class="nt">&lt;/button&gt;</span>
  <span class="nt">&lt;button</span> <span class="na">data-action=</span><span class="s">"slideshow#next"</span><span class="nt">&gt;</span> → <span class="nt">&lt;/button&gt;</span>

  <span class="nt">&lt;div</span> <span class="na">data-slideshow-target=</span><span class="s">"slide"</span><span class="nt">&gt;</span>🐵<span class="nt">&lt;/div&gt;</span>
  <span class="nt">&lt;div</span> <span class="na">data-slideshow-target=</span><span class="s">"slide"</span><span class="nt">&gt;</span>🙈<span class="nt">&lt;/div&gt;</span>
  <span class="nt">&lt;div</span> <span class="na">data-slideshow-target=</span><span class="s">"slide"</span><span class="nt">&gt;</span>🙉<span class="nt">&lt;/div&gt;</span>
  <span class="nt">&lt;div</span> <span class="na">data-slideshow-target=</span><span class="s">"slide"</span><span class="nt">&gt;</span>🙊<span class="nt">&lt;/div&gt;</span>
<span class="nt">&lt;/div&gt;</span>
</code></pre></div></div>

<p>The first difference you’ll notice here is the presence of a new data attribute on the root <code>&lt;div&gt;</code>: <code>data-slideshow-index-value</code>. It’s used to keep the index of the currently selected slide. More on this later.</p>

<p>We also have a whole bunch of HTML with all slides already in place. But if you’re working with Turbo, these slides could also be lazily loaded Turbo Frames. Notice that the target value <code>"slide"</code> is used in multiple elements. No “IDs” are needed in any of the <em>divs</em>.</p>

<p>The corresponding controller:</p>

<div class="language-javascript highlighter-rouge"><div class="highlight"><pre class="highlight"><code><span class="k">import</span> <span class="p">{</span> <span class="nx">Controller</span> <span class="p">}</span> <span class="k">from</span> <span class="dl">"</span><span class="s2">stimulus</span><span class="dl">"</span>

<span class="k">export</span> <span class="k">default</span> <span class="kd">class</span> <span class="nc">extends</span> <span class="nx">Controller</span> <span class="p">{</span>
  <span class="kd">static</span> <span class="nx">targets</span> <span class="o">=</span> <span class="p">[</span> <span class="dl">"</span><span class="s2">slide</span><span class="dl">"</span> <span class="p">]</span>
  <span class="kd">static</span> <span class="nx">values</span> <span class="o">=</span> <span class="p">{</span> <span class="na">index</span><span class="p">:</span> <span class="nb">Number</span> <span class="p">}</span>

  <span class="nf">next</span><span class="p">()</span> <span class="p">{</span>
    <span class="k">this</span><span class="p">.</span><span class="nx">indexValue</span><span class="o">++</span>
  <span class="p">}</span>

  <span class="nf">previous</span><span class="p">()</span> <span class="p">{</span>
    <span class="k">this</span><span class="p">.</span><span class="nx">indexValue</span><span class="o">--</span>
  <span class="p">}</span>

  <span class="nf">indexValueChanged</span><span class="p">()</span> <span class="p">{</span>
    <span class="k">this</span><span class="p">.</span><span class="nf">showCurrentSlide</span><span class="p">()</span>
  <span class="p">}</span>

  <span class="nf">showCurrentSlide</span><span class="p">()</span> <span class="p">{</span>
    <span class="k">this</span><span class="p">.</span><span class="nx">slideTargets</span><span class="p">.</span><span class="nf">forEach</span><span class="p">((</span><span class="nx">element</span><span class="p">,</span> <span class="nx">index</span><span class="p">)</span> <span class="o">=&gt;</span> <span class="p">{</span>
      <span class="nx">element</span><span class="p">.</span><span class="nx">hidden</span> <span class="o">=</span> <span class="nx">index</span> <span class="o">!=</span> <span class="k">this</span><span class="p">.</span><span class="nx">indexValue</span>
    <span class="p">})</span>
  <span class="p">}</span>
<span class="p">}</span>
</code></pre></div></div>

<p>A lot is going on here, so let’s break it up.</p>

<h4 id="targets-property">Targets property</h4>

<p>We can see a different usage of the <code>targets</code> property. Because there’s more than one element with the <code>"slice"</code> value, an additional property <code>slideTargets</code> (plural) was used to iterate through them. Stimulus creates a total of 3 properties for each target:</p>

<ul>
  <li>slideTarget: contains the first matched element</li>
  <li>slideTargets: contains all matching elements</li>
  <li>hasslideTarget: a boolean indicating if there’s a matching element</li>
</ul>

<h4 id="values-property">Values property</h4>

<p>Besides the <code>targets</code> property, there’s a second special property called <code>values</code>. It’s used to denote that Stimulus should look for a data attribute named <code>data-slideshow-index-value</code> that will contain a value with the <code>Number</code> type. After found, this value will be automatically cast to the type specified (Number), and stored in a property called <code>indexValue</code>.</p>

<p>This can be used both to allow the backend to pass in some initial values to the controller, but also as a storage to keep state. Stimulus will keep the property on the controller object and the data attribute on the HTML element in sync.</p>

<h4 id="value-change-callback">Value change callback</h4>

<p>Another difference in this example is the usage of the special method called <code>indexValueChanged()</code>. Stimulus will look for methods following this name convention and call them automatically when the value of the attribute changes. We can see this happening in the <code>next()</code> and <code>previous()</code> methods, which modify <code>indexValue</code> and causes the triggering of the callback. The callback then calls <code>showCurrentSlide()</code> method to update the slide visible on the screen.</p>

<h3 id="final-thoughts">Final thoughts</h3>

<p>As mentioned in the project’s <a href="https://stimulus.hotwire.dev/handbook/origin">guidebook</a>, Stimulus is a framework with very modest ambitions. It provides a set of tools and practices to help us build the frontend of our applications, enforcing the separation of content and behavior. This tool couples very well with Turbo to assist developers in crafting dynamic web applications, keeping the focus on simplicity.</p>

<p>This article covered just a first glimpse at Stimulus’s usage, but I highly recommend reading the <a href="https://stimulus.hotwire.dev/handbook/origin">official</a> documentation, as it covers each aspect of the framework more deeply, and explains in more detail the reasoning behind the design decisions.</p>

<p>In the next posts, I’ll be creating a full-featured simple app to demonstrate how Turbo and Stimulus can be used together to build a real application.</p>]]></content><author><name>Eduardo Vieira</name></author><category term="Hotwire" /><category term="Javascript" /><summary type="html"><![CDATA[An overview on how to add behavior using Stimulus]]></summary></entry><entry><title type="html">A first look at Hotwire</title><link href="https://eduardovra.github.io/a-first-look-at-hotwire/" rel="alternate" type="text/html" title="A first look at Hotwire" /><published>2021-04-10T19:05:01+00:00</published><updated>2021-04-10T19:05:01+00:00</updated><id>https://eduardovra.github.io/a-first-look-at-hotwire</id><content type="html" xml:base="https://eduardovra.github.io/a-first-look-at-hotwire/"><![CDATA[<p>With the arrival of the new kid on the block for web development: Hotwire’s project, I’ve been wondering how this new technology works and how can one possibly benefit from using it. Being something coming from <a href="https://twitter.com/dhh/status/1341420143239450624?lang=en">DHH</a> and the folks from <a href="https://basecamp.com">Basecamp</a>, who are famous for bringing up Ruby on Rails to the web dev scene, I thought it was a topic worth studying.</p>

<h3 id="the-hotwires-approach">The Hotwire’s approach</h3>

<p>The goal of the project is to provide a set of tools and practices, that allows building web applications that behave as SPAs, but writing as little Javascript code as possible. Such tools were initially developed by Basecamp, being the foundation for building their new email service: <a href="https://hey.com">Hey</a>. Those tools were documented and later published as open source projects on <a href="https://hotwire.dev">Github</a>.</p>

<p>Hotwire is divided into two parts: Turbo and Stimulus. Turbo is the component responsible for rendering, and Stimulus is used when additional behavior (Javascript sprinkles) is needed. For this post, I’ll be focusing exclusively in Turbo’s set of tools.</p>

<p>Key points:</p>

<ul>
  <li>For simplicity, rendering should be done all in one place: exclusively in the backend</li>
  <li>To behave as an single-page application, the frontend should avoid re-constructing the entire page on each interaction. Instead, it should do only incremental chances as needed</li>
  <li>HTML is used as the primary data format for communication (instead of JSON), as browsers can handle this format really fast. That’s where the “HTML over the wire” expression came from</li>
  <li>The same solution created for the web app, must also work for native mobile applications (Turbo Native). Rewriting the application once again in each mobile platform is not desirable; So it’s imperative to provide a way of reusing functionality</li>
</ul>

<h3 id="turbo-drive-and-turbo-frames">Turbo Drive and Turbo Frames</h3>

<p>To use Hotwire, the first thing we need to do is to include the Javascript library provided by the project in the &lt;head&gt; tag. This library will perform all the heavy lifting of DOM manipulation for us. More information on how to do this can be found <a href="https://turbo.hotwire.dev/handbook/installing">here</a>.</p>

<p>The next thing would be to divide the HTML page into Turbo Frame segments. These segments are going to be rendered when the browser performs a full page load, but also when incremental changes to the state of the application occur.
This leads us to the first benefit of the technology: reuse of HTML templates.</p>

<p>A Turbo Frame is just an HTML tag with an ID attribute, that wraps a chunk of elements. It looks like this:</p>

<div class="language-html highlighter-rouge"><div class="highlight"><pre class="highlight"><code><span class="nt">&lt;turbo-frame</span> <span class="na">id=</span><span class="s">"message_1"</span><span class="nt">&gt;</span>
  <span class="nt">&lt;h1&gt;</span>My message title<span class="nt">&lt;/h1&gt;</span>
  <span class="nt">&lt;p&gt;</span>My message content<span class="nt">&lt;/p&gt;</span>
  <span class="nt">&lt;a</span> <span class="na">href=</span><span class="s">"/messages/1/edit"</span><span class="nt">&gt;</span>Edit this message<span class="nt">&lt;/a&gt;</span>
<span class="nt">&lt;/turbo-frame&gt;</span>
</code></pre></div></div>

<p>The Turbo frames are scoped pieces of content. That means, when an action is carried out by the user within the frame, only this specific frame is going to be updated. This is accomplished by Turbo Drive, which intercepts form submissions and links clicked on the frame, preventing full page reloads. An Ajax request is performed instead, and the response containing a Turbo Frame with a matching ID will be rendered accordingly. Notice that all of this is achieved with no JS code written whatsoever, and very few changes to the backend. Nifty!</p>

<p>Another interesting feature is that Turbo Frames can be lazily loaded. This alone can speed up initial page loads, by avoiding fetching content not visible.
The caching of lazy-loaded frames can be more effective too, as it allows the separation of contents with a higher frequency of change from contents that rarely change within the page, thereafter maximizing the chances of a cache hit.</p>

<h3 id="turbo-streams">Turbo Streams</h3>

<p>Turbo Streams are a set of CRUD-like actions, provided to allow incremental changes to the DOM. The actions provided are limited to 5: <strong>Append, Prepend, Replace, Update</strong> and <strong>Remove</strong>.</p>

<p>These actions can be sent from the backend as a response of an Ajax call, or pushed to the frontend, when a persistent connection (like a websocket) is active. The format of the tags are like these:</p>

<div class="language-html highlighter-rouge"><div class="highlight"><pre class="highlight"><code><span class="nt">&lt;turbo-stream</span> <span class="na">action=</span><span class="s">"append"</span> <span class="na">target=</span><span class="s">"messages"</span><span class="nt">&gt;</span>
  <span class="nt">&lt;template&gt;</span>
    <span class="nt">&lt;div</span> <span class="na">id=</span><span class="s">"message_1"</span><span class="nt">&gt;</span>
      This div will be appended to the element with the DOM ID "messages".
    <span class="nt">&lt;/div&gt;</span>
  <span class="nt">&lt;/template&gt;</span>
<span class="nt">&lt;/turbo-stream&gt;</span>
</code></pre></div></div>

<p>By using Turbo Streams, it’s possible to execute multiple actions in response to an event, so that, multiple parts of a page are updated reflecting the new state of the application.</p>

<p>The catch here really is: you still need to manage the UI state somewhere, but it now happens to be in the backend. So the complexity didn’t vanish, it just changed places. And that’s in line with the project’s purpose: allow the application to be written in your favorite programming language, as much as possible.</p>

<h3 id="framework-integrations">Framework integrations</h3>

<p>The Hotwire set of tools are not designed to be used specifically with Ruby on Rails framework, although a reference implementation is provided.
Other frameworks have followed on the trail, and most of them already have at least an in-progress implementation.</p>

<p>Googling around was not too difficult to find some repositories:</p>

<ul>
  <li><a href="https://github.com/hotwired/hotwire-rails">https://github.com/hotwired/hotwire-rails</a></li>
  <li><a href="https://github.com/tonysm/turbo-laravel">https://github.com/tonysm/turbo-laravel</a></li>
  <li><a href="https://github.com/hotwire-django/turbo-django">https://github.com/hotwire-django/turbo-django</a></li>
  <li><a href="https://github.com/deriegle/express-hotwire">https://github.com/deriegle/express-hotwire</a></li>
</ul>

<h3 id="to-sum-up">To sum up</h3>

<p>It seems DHH and Basecamp are trying to change the web development paradigm once again, as the Ruby on Rails framework did before.
The Hotwire project is an attempt to bring simplicity back to the web development practice, resembling the golden years when Rails was first released.</p>

<p>If you want to build a web application writing the least Javascript possible, but still want to deliver a good user experience, Hotwire’s Turbo seems to be a good way to go.</p>

<p>This was just a first look at Hotwire Turbo and I’ll be covering more ground over the next posts. Following on, I’ll be checking out Stimulus and how Turbo and Stimulus work together.</p>]]></content><author><name>Eduardo Vieira</name></author><category term="Hotwire" /><category term="Javascript" /><summary type="html"><![CDATA[My first impressions of this new way of building web apps]]></summary></entry></feed>